25 Years of the Model M (by Chris McDonough)
Model M Modifications (for "Modern" Systems, by John Szybowski)
Care and feeding of the IBM Model M keyboard (by Andrew Preater)
Model M page (archived)
Buckling Spring Page (by Sandy)
Model M Buyer's Guide
Model M Bluetooth Convert with Bluefruit EZ-Key HID
Buckling Switch
Cable Pinouts
AT Keyboard and SDL Pinout
PS/2 Keyboard and SDL Pinout
RS/6000 Keyboard and SDL Pinout
SDL Connector
Model M PCBs
PS/2 Model M PCBs
RS/6000 Model M PCBs
Terminal Model M PCBs
J8 Pinout
Speaker Grille
RS/6000 Keyboard Speaker
Keyboard Keyclicks Without Keyboard Speaker?
Optional Keyboard Cable with Speaker
Model M Generations
Keyboard Evolution
Present Model M Manufacturer
Model M parts
Cleaning the Keyboard (How to Open the KB)
Socket Sizes Needed
General Keyboard Maintenance
Fixing Detached Plastic Base
Incompatible IBM Keyboard
Buckling Key Switch
Buckling Spring illustrations are from
Wikipedia.
Buckling spring key on key press and release.
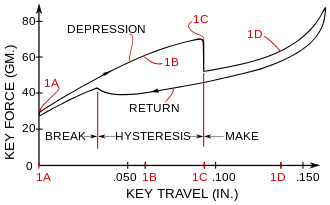
Graph of key force over key travel for a buckling spring key. Visible in graph
position 1C the fast force drop when the spring buckles.
Source: US4118611 Buckling spring torsional snap actuator
(Google Patents)
Cable Pinouts
AT Keyboard and SDL Pinout
|
| DIN |
Signal |
SDL |
| 1 |
+KBD DATA |
B |
| 2 |
Reserved |
F |
| 3 |
Ground |
C |
| 4 |
+5.0 Vdc |
E |
| 5 |
+KBD CLK |
D |
| 6 |
Reserved |
A |
| SH |
Frame Gnd |
SH |
SH - Shield
|
PS/2 Keyboard and SDL Pinout

|
| PS/2 |
Signal |
SDL |
| 1 |
+KBD DATA |
B |
| 2 |
Reserved |
F |
| 3 |
Ground |
C |
| 4 |
+5.0 Vdc |
E |
| 5 |
+KBD CLK |
D |
| 6 |
Reserved |
A |
| SH |
Frame Gnd |
SH |
SH - Shield
|
RS/6000 Keyboard and SDL Pinout
|
| PS/2 |
Signal |
SDL |
| 1 |
+KBD DATA |
B |
| 2 |
Spkr Signal
|
F |
| 3 |
Ground |
C |
| 4 |
+5.0 Vdc |
E |
| 5 |
+KBD CLK |
D |
| 6 |
Spkr Gnd
|
A |
| SH |
Frame Gnd |
SH |
SH - Shield
|
Note: The RS/6000 keyboard port has the additional
speaker data and ground signals that the PS/2 keyboard ports lack.
SDL Connector
SDL - Shielded Data Link, a type of shielded connector created by AMP and
used by IBM and others for keyboard cables.
AMP 1-520424-2 CONN PLUG 6POS SDL 24-26AWG RND
Product Page
Drawing
Application Specifications
Instruction Sheets
Model M PCBs
PS/2 Model M PCBs
DOB is 01SEP88 P/N 1393291 PCB is 170 mm x 50 mm
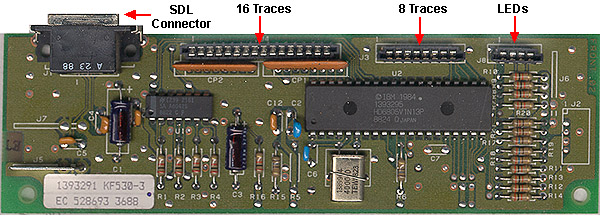
J5 lower left 1/4" QD tab.
U1 NS 239 2161 SA A60425
|
U2 HD6805V1N13P
Y1 4000.0 xtal
|
PCB from 08SEP89 is similar, the outline for J2 is gone, Y1 is now a little
poly coated three pin package.
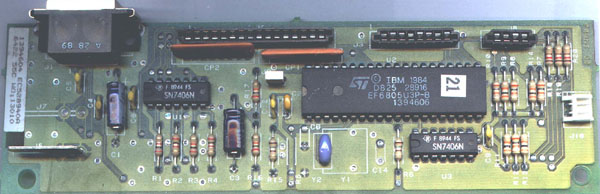
DOB is 19NOV91 P/N 1395601 PCB is 150 mm x 38 mm
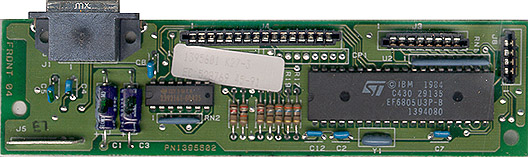
U1 TI 2392161-60425 137 3 Q CK
|
U2 ST EF6805U3P-B
|
PCB is 91-ish PCB is P/N 1395604
U2 Motorola 1394079 (possibly IBM house #)
DOB 31JAN92 P/N 1397553 PCB is 150 mm x 38 mm
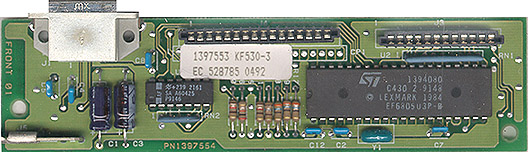
This is a simper design. J3 and J8 have been combined into a 12 pin header,
J3.
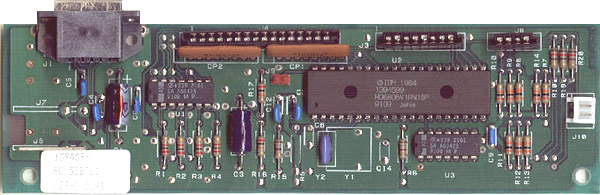
DOB 20MAR93 P/N is 1398012 PCB is 162 mm x 50 mm

U1 TI SN7406N
|
U2 ST EF6805U3P-B
|
CP1 and CP2 (B9HC0114 102MX8) are now back. See the outline for J2 (4-pin
header) right below the SDL port?
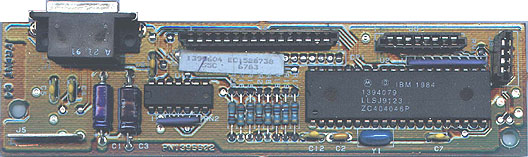
RS/6000 Model M PCBs
DOB of 05-31-91 PCB is 1394596, whole KB is 1394540 (ID# 4023580)
CP1,2 B9HC0114 102M x8 cap pack
J10 Speaker connector
|
U1,3 2392161 (7406 TTL chip)
U2 1394599 HD6805V1RN18P uController
|
Rick Ekblaw sent me the original image and said:
You will notice that this scan is most similar to your P/N 1393291
scan. It is also 170 mm x 50 mm in size, and the connector layouts are
basically the same. There are some minor layout differences, and the second
7406 open-collector hex inverter and the J10 speaker connector are the obvious
additions. One side of J10 goes directly to pin 6 on the SDL connector, which
is why the RS/6000 keyboard cable can not have the "missing pin" found on some
PS/2 keyboard cables.
The speaker is a little 8 ohm, 0.2W job, IBM part number 1392326.
PCB is 1394596. (Photo from Gereon Wenzel)
Terminal Model M PCBs
(Photo from Gereon Wenzel)

J7 3-pin header, KB cable connector?
U1,4,5 SN7406N (?)
|
U2 Motorola 1387587 (IBM#?)
U3 unpopulated
|
Why is the upper right tape receptacle of the Terminal keyboard shorted with
a sheet of alloy?
J8 Pinout
This little dapper devil switches orientation between horizontal and
vertical. The LED tape has to bend on the vertical.
The Ground trace is almost twice as wide as the other three. The ground
trace is always towards Pin 1.
Speaker Grille
>Well I know this has nothing to do with cleaning but... what is that
hole on the bottom of PS/2 keyboard. It looks like a mounting place for some
kind of a speaker or what?!
The first series of the MF-keyboard called MF-1 which lacked the 3 status
LEDs had in fact a speaker. It was designed for the XT family of IBM PCs and
was intended to be used for "professional typists", which preferred to have a
"click" in addition to the mechanical "keyclick" itself. There was a software
available, which enables / disables the speaker click... standard was "On"
AFAIK. Worked with that thing for some time back in 1987...
The MF-II design 101/102 keys *with* the 3 status LEDs inherited
the entire case - and the speaker "grille" was left as an artifact and no
longer used or needed. Guess it was cheaper for IBM keeping the old molding
forms - and produce two keyboards on the same machinery.
Ed. I can't confirm the text above, but the
speaker is for sure present in the IBM Soft Touch keyboard ("greasy buckling
spring") and also in some RS/6000 keyboards.
RS/6000 Keyboard Speaker
The speaker is a little 8 ohm, 0.2 W job, IBM part number 1392326.
Keyboard Keyclicks Without Keyboard Speaker?
Model M Without Speaker on RS/6000.
Some systems were shipped without a speaker in the keyboard or system unit
(specifically, the "Quiet Touch"). The following shows the keyboard attached to
a speaker box with a 3 ft. cable which attaches to the standard I/O port K. The
speaker box has a keyboard connector to pass the keyboard signals through to
the keyboard. The keyboard cable is supplied with the keyboard.
Optional Keyboard Cable with Speaker (FC #6599 or FRU 93H8878)

PS/2 Keyboard on RS/6000 Keyboard Port
Gathering data, but maybe cobble together a small enclosure with a fully
wired RS/6000 Keyboard port, pull out the two connectors needed for a speaker
mounted in the enclosure, and pass just the keyboard signals to a normally
wired KB port to feed a Model M.
Note: I am totally unsure of trying to run a
RS/6000 Model M with speaker or the Optional Keyboard Cable with Speaker off of
a Personal System/2 Keyboard port. IBM refers to Pins 2 and 6 as "Reserved" on
a PS/2. If you are lucky, they are Non Connect (N/C). What happens if you plug
a fully wired RS/6000 keyboard cable into a PS/2 keyboard port is
undefined.
Update: Older RS/6000 probably need a keyboard
with an RS/6000 compatible uProcessor. Later systems could use a PS/2 keyboard,
IIRC. So using the optional KB cable w/speaker and a Model M with PS/2
compatible uProcessor might not work on an earlier RS/6000. An RS/6000 KB might
not work on a PS/2, due to a different KB uProcessor.
Model M Generations (from Tony)
I've encountered 3 different quality levels of the IBM 101's so far:
- Removable cable, heavy, clicky feel (the best)
- Fixed cable, but same weight and click feel (OK) - Lexmark built
- Fixed cable, non-click squishy feel (horrible) - Lexmark built
All of the Win95 style 104's I've seen sucked.
Keyboard Evolution
Peter Wendt wrote:
The "M"-keyboard "as we know it" with the 101/102 keys design and
the LEDs for NumLock, CapsLock and ScrollLock has been introduced along with
the PS/2 in 1987.
The "MF-II Text/Data Keyboard" was available earlier as "MF-1" for XT,
XT-286 and AT and seemed to have a dual-mode interface, since it had no LEDs
and worked along with the slower PC/XT keyboard interface
(non-bidirectional).
The MF-1 keyboard had been introduced in 1985 for the PC/XT/AT line to allow
people to use F-keys, cursor control and separate number pad - particularly for
use with a 3270 / 5250 host emulation (introduced the separate Print / SysReq,
Scroll and Pause/Break keys along with the sixtett of keys between cursor and
Print / SysReq used mainly for the IBM Assistant software series). Therefore
you will find a line with "(C) 1985 IBM Corp." on the decal underside of the
M-keyboard. This is the year where the original (non-LED) design had been
patented.
The oldest "MF-II" keyboards (with LEDs) you may find will be those produced
by IBM for the launch of the PS/2 in early 1987. They presented the family as a
whole new product line - new designs, new keyboard, new monitors, new formats
and new expansion bus. Before that the old "clickety-click" keyboard with 10
F-Keys to the left ruled. And before that the PC and XT 88-key with no F-Keys
at all.
The "new" design of the MF-II was primarily made by moving the F-Keys above
the text- /datakeys like the PF-Keys (programmable function keys) on the3270
Terminals of that time - however only 12 of them, not 24. "No one ever needs 24
function keys ..." (No one ever needs more than 640KB RAM...)
This keyboard made it over the whole world. Even most nowadays keyboards
copy the same basic layout. No matter if they split the keyboard into halves or
half-round layout - the basic arrangement is the same as on the keyboard IBM
*designed* in around 1980 for the 3278 / 79 graphic terminal and later altered
the same design for the PS/2 family.
Also a very unique feature of the "M" keyboard -not copied by the cloners-
is the two-parts keycap. The most intriguing version is the "transparent
keycaps" version sold for host programmers. The "letter" keycaps can be taken
off and were replaced by transparent keycaps - with small pieces of paper
between key body and cap.
This allows programmers to define own keyboard "Symbols" and have
appropriate lettering on them during the development phase. I must have a set
of these caps around anywhere - along with a "letter mat" for ALGOL or APL-2
programming language symbols.
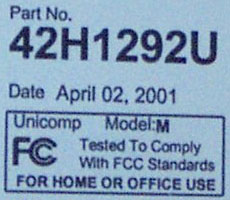
Present Model M Manufacturer

Unicomp bought the buckling
spring technology from Lexmark.
Ian Warford wrote:
They most certainly are still manufacturing them. They even
(according to the sales guy I talked with) plan on making some black buckling
spring 101's next year. Oh, they also make 104 key windows keyboards that feel
the same as the old IBM ones (Ed. almost the
same).
Note the manufacture date on my Model M:
Model M Parts
If you have a desktop, the 5' cable might work for you. But for myself, I
prefer the 10' cable. If you have a 80/85/95, you have to go to the floor and
behind the system. If you have a desktop, you usually have to run the cable
behind the system. This way you can sit away from the monitor.
Looks grim to find the long PS/2 to SDL cable, you will probably have to get
a male/female PS/2 cable...
Keyboard Cables (Looks like they are 5' long)
1398094 Detachable Y Cable
1379947 Detachable Y Cable - Black
1395110 Detachable PS2 Cable - Pearl
Other Parts
PVPLASM Pivot Plate & Spring Assembly
INSERT Stabilizer Insert (Enter key, Black - Vertical Keys, White - Horizontal Keys)
MEM Membrane assembly (Enter membrane assembly P/N you wish to purchase)
49G2224 Replacement Pointing Stick Caps
LED LED Overlay - Num / Caps / Scroll Lock (Model Ms used "Pebble - LEDs on bottom")
BUTTONS Buttons, printed, unprinted, sets, singles...
Cleaning the Keyboard
> Can I safely open the keyboard or will all the springs, keys, etc. jump
out and land on the floor?
From Bob Eager
Remove the four hex head screws underneath (one needs a long thin
hex socket). Detach the cable too. Turn the keyboard the right way up, and
remove the top half of the casing. All should be OK.
I use a pastry brush to clean it. You can remove most of the keys
(except for some of the 'long' ones which are best left alone). Be very careful
not to squash the spring when putting the key assembly back. Best to tilt the
keyboard, and let the spring 'fall' into the slot in the key as it is pushed in
(try it and all will be clear). Take the keytop shells off to clean, of
course.
From Helmut P. Einfalt:
And after you've done that, put all keycaps into an old stocking
(ask your better half if she has one with a ladder for you...), knot it so as
to keep the contents as loose as possible, and take that bag as well both
halves of the keyboard shell to the dishwasher.
Wash it with a standard dishwasher program -- you'll not recognize
your keyboard afterwards anymore... (And yes, you must take out the electronic
innards before washing). If you don't believe me, go ask Don Peter... Did that
on the original PS/2 mouse, too... Works like a charm.
From Peter:
Do *not* remove the lower part of the keycaps - only the upper
part with the "lettering". The keycaps are a two-part assembly: the "pushrod"
and the keycap itself. Remove all keycaps - be careful with the spacebar and
the "bigger ones".
Socket Sizes Needed
From Myself, god-Emperor of Microchannel:
I used a 7/32 socket - (5.5mm metric size is) a nutdriver or a
deep socket. The important thing is something deep enough to fit in the well
that most of the screws are in.
From Peter:
I got a SKG (Made in Germany) No. 493,
5.5 mm Chrome Vanadium. From the "tool wall" of our local super-market for
about $3US. Looks like a long screwdriver with a thin walled socket as tip.
Works perfectly well since 1987...)
Dr. Jim:
Speaking of Snap-on, they do carry a nice long socket that works
for these. We bought one for our shop; not cheap, but worth it. 5.5 mm,
IIRC.
Allthumbs says:
I'm in Canada so the part number may not be applicable south of
the border, but this will do the trick. Go to Sears and buy a 7/32" Craftsman
deep socket, part number 0942771. You don't even have to buy the 1/4" wrench to
fit the socket onto, you can just use the little plastic holder that the socket
comes with, because there usually isn't much torque on the screws that hold the
IBM keyboards together. Just apply even steady force and you can solve this
little problem for about three dollars. (Ed. I now
agree after opening up three Model Ms with the socket alone)
General Keyboard Maintenance
From Peter:
Most of the original IBM-keyboards have separate keycaps, which
can be removed very easy. Under this cap sits the key-'corpus' and underneath a
small spring. This spring is fixed with a contact-plate inside the
keyboard.
Attention: It is very easy to bend, deform or pull
out this spring... but very hard to get one back onto the contact-plate to make
the key work properly again. Take care! In case you accidentally removed the
key-button entirely from the keyboard:
- Make sure, that the spring isn't off from the contact-plate by gently
touching it. If it returns to vertical position it is okay.
- Separate the keycap and the lower button part
- Look inside the button: there's a small plastic nose to set the spring
into.
The U-shaped cutout must be positioned to the rear of the keyboard.
- Lift up the keyboard at the frontside.
- Make sure that the spring falls to the rear of the surrounding collar
- Slide the button inside the collar and gently press it down until you hear
the button snap in and contact-plate clicking.
Watch out not to bend or damage the spring during this process!
- Check the function of the key.
Clicking must be audible and the tactile 'feel' must be as usual.
- Now install the keycap again.
You will have to remove the keytop in case some dirt (mainly coffee
or Coca-Cola) sits between keybutton and the collar. Keys then tend to stick,
the feeling while pressing the key is somewhat soft and sticky and the 'click'
after releasing the key is somewhat delayed. Cleaning inside of the button
(...not the cap!) and the key-collar with alcohol will mostly solve these
problems.
It is a good idea to maintain the keyboard frequently.
Remove all keycaps except the space-bar and probably the two larger keys on
the right side ([+] and [ENTER] from the numeric keypad). These keys have
additional metal guides at the underside and are hard to re-assemble. Use a
small screwdriver or the special IBM 'Keycaps Puller Tool' to remove the caps.
If you are not concerned ... well ... remove all caps.
Use a longhaired, harder brush to clean the areas around the keys from dirt.
In most cases this is just dust, but sometimes there are hair-needles, nails,
screws, clamps and other stuff. Turn the keyboard upside down and shake it...!
It would have been a good idea having tried this over a waste-bin,
right?
Better next time.
Cleaning the dirty, sticky keycaps is easy if you have a washing-machine or
a dishwasher. I prefer dish-washers. Fill all the keycaps in one of these
plastic nets which are used to pack oranges. Use a piece of wire or a nylon
strap to have the net securely closed. Then put it in the dish-washer. Use some
cleaner on it - as if you wanted to clean your dishes like usual.
After
this they look like new.
I use the same procedure on the entire keyboard housing by the way. It is
quite easy to disassemble. 3 hex-screws from the underside, remove keyboard
assembly and internal circuit board and put the two housing halves in the
dish-washer too.
Now, this is much harder if you have only a washing-machine. It is
Not recommended to treat the keyboard housings this way - they will
break in pieces. The keycaps can be washed as well. But not too hot. I had good
results in pre-washing with 30° C and put them inside of one old nylon
stocking. Basically the same procedure as with the dishwasher...
Fixing Detached Plastic Base
I was delving deeply into the azure realm, when I noticed my Industrial
Model M keys were "flexing" before they would do a left Shift-(letter). This
was odd, at the time I swapped out the keyboard and thought nothing of it. I
finally opened up the case, only to find a goodly number of the melted plastic
studs had snapped off, hence the flexing when the key forced the plastic frame
down close enough to the curved metal base to create a closed switch...
Searching the web brought up many mods using either wood screws, metal
screws, or the omega device, nut and bolt. Being the lazy kind, I asked on the
PS/2 Hardware forum for advice. As usual, it came from a man used to the glare
of camera strobes and the sighs of starlets that can't catch his
attention...
Dr. Jim Shorney takes time from filming infomercials and gives us a
prescription:
"Diamond Jim" to his clique, otherwise known as "The Solder God to the
Stars" let slip his new Hollywood method of re-attaching the plastic base to
the curved metal base:
"The guys that write these nice tutorials don't know about plastite screws.
I found a size that works well from McMaster-Carr. Worship me some more and I
may enlighten you.
"From the Holy Coffee Can of M-bits...
2-28 x 1/4 TX PLUS HF
PT 48 TORXPLUS — T6 Drive
McMaster-Carr SKU 95893A153 50-pack
Also bought #48 and #49 drill bits via ePay to cover all bases."
"Material locks against the triangular (tri-lobular) shank to ensure a
vibration-resistant connection. Also known as Plastite screws, they have
coarse, sharply angled threads and a blunt tip. They provide maximum holding
strength with minimal stress in formable plastics such as polypropylene and
polycarbonate. Length is measured from under the head for pan head screws and
from the top of the head for flat head screws."
Incompatible IBM Keyboard
From Charles Lasitter:
Part 84G2524 / FRU 84G2529, mfg date 09/28/99, vendor: Unicomp;
IBM has managed to do the unthinkable. It now makes PS/2 input devices that
can't stand the sight of real PS/2 equipment.
Specifically, keyboards made by this vendor for IBM work great in
Aptivas, but don't like Model 77s, 95s, and so on. Generates the "301" keyboard
error right away in the Model 95 computers, and generates nonsense keyboard
output attached to a Model 77.
I had several TrackPoint keyboards with sticky / weak left mouse
button bars, and I submitted them for service. The failure was really one of
annoyance / hindrance, as opposed to just plain broken keyboards.
Well, these keyboards were returned in their place, and the
manufacturer was a new one. I can't remember the first manufacturer, but I'd
advise you to try FIND OUT before you go buying or giving up any currently
working trackpoint keyboard of this type.
|