|
What About The Hard Disk LED?
Based on content by William R. Walsh (original HERE). Edited by Major Tom.
Your Model 25 can support 1 hard disk drive, and although installing the drive is done the same way for each system, the connections you need to make will vary.
EduQuest hard disks are not yet covered on this page or site. That information will be coming soon.
Note: If you have two floppy diskette drives, the one at the right of the system will have to be removed before you can install an internal hard disk drive.
The 25SX has onboard IDE, as well as a provision on the planar board for a power connection to an IDE drive. The 8086 and 286 equipped Model 25 do not have any provision to power a standard drive, nor do they have a standard connector like IDE or SCSI. You will need to obtain an IDE or SCSI card that contains a BIOS to boot from if you install any other hard disk than the original IBM one.
If uncertain about your system's disk configuration, check your planar type by opening the machine and making a visual comparison to the outlines here. You could just note your system's model and make a guess as to what you have, but I highly recommend taking your system open to be certain. You may be pleasantly surprised to see that someone has already installed an aftermarket disk controller, especially in the 25-286 and XT systems.
1. Turn the computer system off and disconnect all cables. Put your Model 25 in a place that has plenty of room and is well lit.
2. Insert a flat-blade screwdriver between the top edge of the blank cover plate and the computer base. Lift up on the screwdriver and remove the cover plate. (Ed. I find it much easier to grab the cover plate with my hand and pull it out. It also works well to take the system apart, remove the planar base assembly, and push the blank plate out that way. You will have to use something other than a screwdriver anyway if you are removing a floppy disk drive cover plate.
Note: If you have the cover-lock front plate, it can only be installed while the computer is apart.
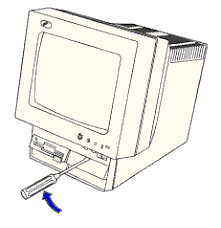
3. Carefully place the computer face down on a flat surface. (Ed. You may want to place a soft towel over the system's display to avoid scratching it.
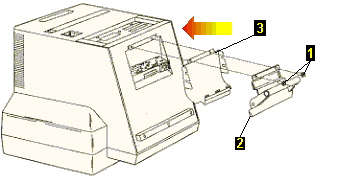
4. Remove the 2 screws (1), the tilt mechanism (2), and the foot shield (3) (if your system has a foot shield).
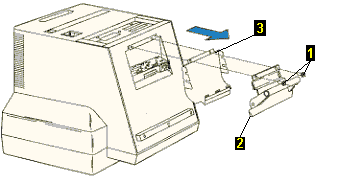
5. Remove the two screws at the rear of the system that hold the base on. Lift the base approximately 1 inch.
6. Remove the computer cables from the cable hook as you lower the base. (Ed. Don't just let the system's base fall down, especially if the cables are in the cable hook. You may break something!)
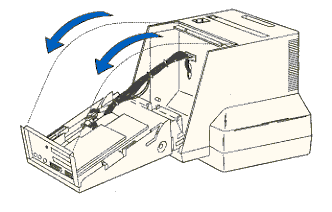
If you are installing the hard disk in a 25SX, remove the LAN attachment card if you have one. You will know if you have one of these because connecting the hard disk power and data cabling will be very difficult to do with the card in place.
7. Disconnect all cables from the system board. Depending upon your system, you will have 2 or 3 cables total to remove.
8. Disconnect the base from the display by pinching the cover release clips.
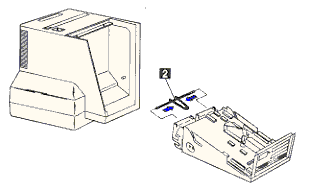
Note: You can't just pinch the cover release clips together. There isn't enough room for both of them to come in far enough when they are lined up. As such, you should bend each clip slightly so that both can retract and allow the planar to come out of the system.
9. Remove the cable retaining bracket screws and the bracket itself.
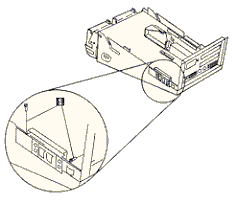
Editor's note: After you have run your hard disk's cabling through the area where the cable retaining bracket goes, you may find it rather difficult to reinstall it without pinching or crushing any of the cables. It is OK to leave it out if you can't get it back in.
10. Prepare your hard disk drive by unpacking it and sliding it onto the metal tray inside the system. (if the metal tray is missing, see below for more information...)
Note: Make sure the hard drive is fitted with the IBM holder that slides onto the metal tray before you slide it onto the metal tray. Otherwise you might shear components right off the bottom of the drive!
If you don't have the metal hard disk tray installed in your system, don't just slide the drive into the empty bay inside the computer. Even if it is on the IBM plastic slider, it will be loose inside the system, and parts of the drive could contact the metal casing of the computer and cause a short circuit. As of this writing, I don't know of a good way to install the drive without the metal tray and would be open to suggestions. Insulating the bottom of the drive is a good idea, but I haven't found anything to use so far that wouldn't prevent the drive from having air circulated over it.
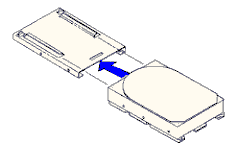
11. Turn the computer base on its side and run the data (or data and power) cable to the bottom of the system. Place the cable(s) as close to the hard disk's drive bay as you can get them.
(Note: It is a a good idea to use long cables so that when you install the drive, you can pull the cable(s) through the front of the drive bay and connect them to the hard disk drive.)
Pull the power cable through first, then pull the ribbon data cable through next.
Connect the cables to the drive--remove it from the bay (slide it out) if you need to do so.
12. Plug the cable(s) into the planar (25SX or original IBM hard disk users) or the appropriate adapter card.
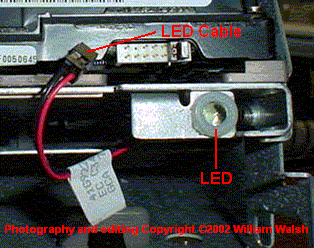
If you have a 25SX, you may want to connect the LED on the metal tray to the hard disk drive, especially if your hard disk doesn't have its own LED or supports an external LED.
13. Reattach the cable retaining bracket if you can, and reinstall the LAN attachment card for your 25SX if you have one.
Now you need to install the locking front cover plate (if you have one to install!)
14. Move the computer base out of the way and carefully turn the display upright. If you have the locking cover plate, install it by hooking the bottom in and snapping the top into place.
If you do not have the locking cover plate, you will need to re-install the blank cover plate you removed earlier. Place it so that the bottom of the plate hooks in. Snap the top into place.
Note: On the 25-XT and 25-286 your locking assembly may have a wire that attaches to the planar so you can lock both the system unit and the keyboard when you are away. Unless you have the keys, this keyboard locking feature doesn't make any sense. I'd advise either leaving the connector unplugged or cutting the wires off of it. The 7386 planar upgrade and the 25SX planar do not use this connector.
15. Place the display face down once again.
16. Replace the computer's base by pinching the cover release clip and inserting it into both holes in the side of the computer. If the cover release clip came out when you removed it (a common occurence) simply pinch it back together and put it back into place in the system's base. Pinch it again to retract the "arms" and reinstall the system's base.
17. Reconnect all cables that you removed from the planar. Put the cables back into the cable hook if you removed them.
18. Being careful not to pinch or crush any of the wires, fold the system unit base up into place. Fasten it with the two screws you removed earlier.
19. Put the foot back on the system. Move any ribbon cables gently out of the way if needed. Replace the foot cover, the tilting foot, and then the two screws that hold the foot into place. Plug all cables back into the system.
20. If you installed an IDE hard disk in your 25SX (or an original IBM hard disk into your 25-XT or 25-286) you will need to use the starter diskette to update your system's configuration. IDE and SCSI hard disks on adapters that carry their own ROM BIOS for booting purposes may have different setup procedures or work right off the bat.
What About The Hard Disk LED?
This section is for those who either don't have the locking bezel for the hard disk, or for those who have a hard disk that doesn't have an onboard LED (but your controller or the disk has a connector for one)
If your hard disk or hard disk controller has an LED output, you probably already realize that you can plug an LED into that and have a hard disk activity indicator. This section answers the questions about what kind of an LED you'd need and where to put it once you have one.
What kind of LED do you need? For most controllers and hard disks, you will need a 5 volt LED--or an LED that can stand 5 volts being applied to it. Color of the LED is up to you, but I'd choose either blue (because it's an IBM, of course!) or white (because a white LED is just plain cool lookin'!).
You'll also need some sort of cable to connect the LED. That part should be obvious as to what your particular situation requires to get things hooked up. In any case, with a LED polarity matters! Get it backwards and the LED won't light...
Now, where to put it...
If you have the locking hard disk panel, placement is easy. Simply locate the LED up against the clear spot for it to shine through. As for keeping it there, that's up to you. Being the Super Glue Artist® that I am, I would recommend putting it there with a tiny dab of super glue.
If you only have the blank panel, you can run your LED over to the floppy disk drive's clear LED panel. Done right, this gives you a "dual mode" LED in one color for the floppy and the other for the hard disk. I've done this on several of my Model 25-XT systems, and the stock IBM hard disk usually even has a connector for the LED to plug into, as well as an onboard LED. The picture below shows the modification I did...
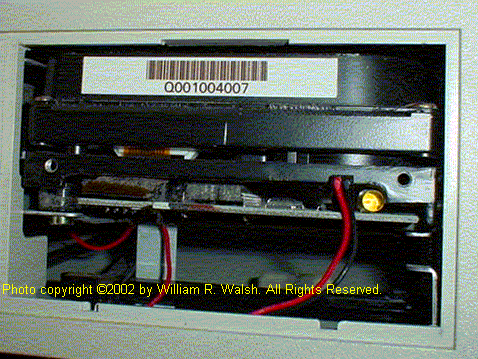
Sorry for the large picture, but I coudn't think of a better way to show what I did... The LED cable comes from the drive (you may have to use a short connector for this or it might not fit...as you can see mine is bent upwards) and runs over to the the clear piece of plastic in the floppy bezel. When the drive is accessed, it shows up in the floppy bezel quite nicely.
|