|
In order to save us lots of unnecessary work, here are some recommendations
for the submission of scans of adapters and parts to The Tool.
Please Let Us Know if
you have any relevant material.
Documentation
If you have driver disks, ADFs, user's guides, etc. we would like to hear
from you!
Check if the company still exists and if you can find those same drivers or
manuals on their website or somewhere else. If you had no luck finding them
online, chances are good that we don't have them either.
If the company is gone or no longer remembers your adapter, please zip the
files and send them to us. For manuals, if you can scan them, fantastic! If you
have no scanner, making a copy and mailing it to one of us fine. If you have
extra manuals, send them over.
Camera Images
Camera shots may be at whatever DPI you want, but I may make a lower
resolution image for the page, and link the larger image to it. Camera shots
tend to have poor lighting and are at an angle... Cameras have one focal point,
and there is distortion the farther away from dead center one gets.
Take Me Down To Parallax City
|

|
This depicts the challenge that using cameras bring. You can get everything
at once, but now detail may be lost due to it's being masked by other
components. Also, there will be distortion of spatial relations towards the
edges.
Ed. spatial relations does not refer to
the person you could of swore was from outer space...
|
Flatbed Scans
This is the preferred method for creation of adapter and part outlines. The
card/part will be about as accurate as can be for dimensions. In other words,
"what the doctor ordered and why the preacher danced".
Flatbed Scanner - No Parallax
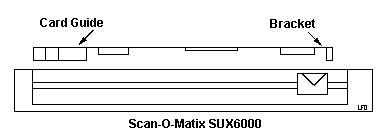
In this example, the adapter has a card guide to keep the card's PCB at the
same height above the scanning head. Don't expect this to happen every time
since some adapters (and planars) lack card guides. Also, some cards tend to
pivot on the guide and bracket. To fix that, I use a small object near the
bracket to weight the card so it rests parallel to the glass. For cards without
guides or for planars, use something to prop up the PCB. SIMMs work fairly
well, BTW...
Use paper to cover the top of the card. This gives you plenty of reflected
light to determine the outline of the card. If you let external light to be
scanned, it will do a job on your brightness and contrast. You can use scrap
paper, but the clearer the paper is, the easier to see the PCB edge when
adjusting the angle. The covering paper doesn't have to be super tight, like
scanning in a closed room with no lights, but I find that three to four sheets
of normal 20lb paper get the job done.
Please scan at 300dpi or higher. Use JPEG and set image quality to 8-9. If
possible, scan the back of the card scanned as well. Please have the scans
aligned in the same direction.
Long Adapter Scan First Scan
For long adapters, please do not send one scan that cuts off an end. What
you need to do is scan the card bracket end towards the front. Where the scan
ends, do another scan from the card guide back towards the card bracket.
Long Adapter Scan Second Scan
|
|
I only need about 1/4" overlap between the two scans to properly align them.
It is easier if you do the second scan so it cuts a chip or component in half
(roughly) so I can eyeball where the scans are in the right alignment.
|
Modules or Daughtercard Scans
For cards with modules or daughtercards, scan at the same
setting used for the adapter. I will do the calculation so the adapter
and the card are at the correct size relation to each other.
Unless your scans are totally washed out, please let me do the contrast/brightness
on your images.
Try to Keep it Straight!
I can't set adapters up at perfect right angles on my scanner, and I don't
expect you to, either. BUT... most software allows you to free rotate or enter
an arbitrary angle to rotate the image. For long adapters with bulky
components, the adapter may not lay on the scanner and you can't exactly shim
it up to the same height. Do your best, and I will "interpolate" your
scans.
For those looking for the edge, you can scan system planars. There, I
usually had three separate scans where the board is at a different angle to the
glass. If you burn with desire to scan a planar, do your best to prop the board
up so it's at the same angle to the glass surface, get enough overlap between
scans (make sure scans overlap!), and I'll stitch 'er up.
Submitted Outlines
As men know, size is everything... I chose to use 600 pixels wide as a
format. I can't tell what kind of "Super-Whizz-Bang" machine you have [from Bob
Watts]. For all I know, you have barely managed to get online and are
desperately searching for drivers, manuals, or configuration information to get
something to work better.
Example - Windows VGA is 640x480. So your looking for the drivers for the
whatever card, and all the images are... oops, too long to fit in the screen.
Rule of thumb, full length adapters will be 600 pixels or a little less. Cards
like the Corvette are 450-500 pixels in length. Just look at the image
on-screen and see what the height to width ratio looks like. A small card like
a BOCA parallel port card 600 pixels wide would result in mega wasted
space.
If possible use the following typeface for the component IDs:
Arial, 9px, Bold, no anti-aliasing, no subpixel rendering
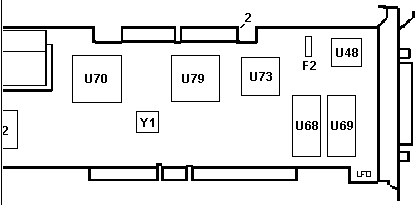
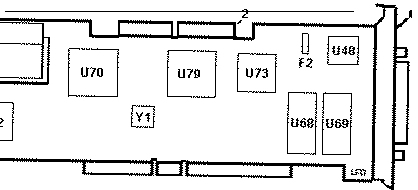
NEC MGE
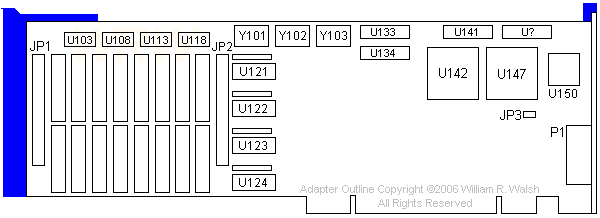
In this neo-classist version, the artiste known as "William R. Walsh" has
cunningly used color to wake up the viewer. He has chosen to detail the video
memory on the left, although there isn't enough space to put the Chip IDs on.
The empty area is most likely populated with support logic chips, and therefore
is not detailed.
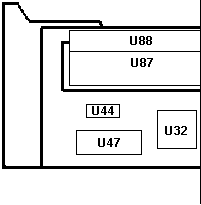
BusLogic BT-646 S/D
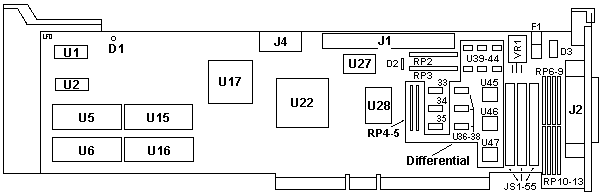
In this ode to austerity, the artiste known as the "God Emperor of
Microchannel" approaches this difficult combination of two adapters that share
the same PCB with a "callout" around the Differential version components.
Again, much of the support logic chips are omitted.
SVGA-CL28
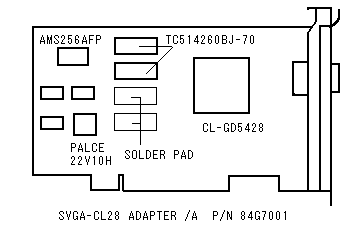
This simple and understated image is from Sandy. Note the use of component
IDs on the image. While this technique may work well for adapters with sparse
components, it becomes unwieldy on more densely populated cards. The embedded
text is also invisible to search engines and can't be copy-pasted. For these
reasons the displayed approach should be avoided.
Reverse of Corvette
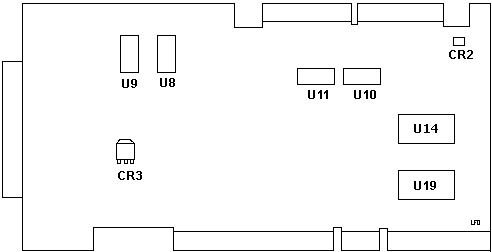
This is one of the times that detailing the back is worthwhile. After
further study, U8,9 were determined to be autotermination for the external SCSI
channel, U10,11 autotermination for the internal channel, CR3 provides TERMPWR
for the external channel, U14,19 are the RAM for the adapter commands, and CR2
is the status LED. Ed. see the amount of screen
that the Corvette takes up at 500 pixels?
Rework
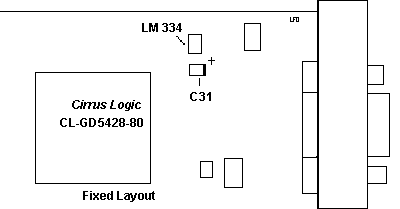
This outline is an illustration of a fixed component on the 1MB SVGA. C31 as
originally installed, causes a flicker, and eventual failure, of the video
output. When a component is crucial to understanding, put it on... (thanks to
Peter Wendt, Jim Shorney and David Beem for tracking down the reversed
capacitor problem).
Stylebook for Detailing Scans
Outline:
- Significant Chips (controllers, A/D, VRM, fuses, RAMDAC, etc.)
- Jumpers (at least the block outline, individual pins are extra)
- Headers (inter-board, memory sockets)
- LEDs (both through-hole and SMD versions)
- Unpopulated Components (solder pads / silk screen for jumpers, headers, etc.)
- Reworks / bodge-wires
The goal of outlining the card is not to faithfully record everything, but
instead to aid in card identification, illustrate component layout, and draw
attention to significant items.
Post-Scan Processing
Once you have sent the image, you aren't done quite yet. After I put
everything together, convert to 600 pixels at 72dpi, then I do the chip IDs.
Sometimes the manufacturer puts the chip ID under an edge, or the markings on a
chip aren't clear. If it's possible, please have the card out until I get done.
If it's a critical adapter, please let me know, then I can put it at the top of
my list. If I can't get to it, then "c'est la vie", I'll put it up as-is.
(Guttural French courtesy of "Diamond Jim" Shorney.)
|