|
195-055 IBM 3116 PAGE PRINTER MODELS 001, 002, 003
Lexmark
Optra R+
Lexmark FTP File Site
Printer
Bi-directional Communication Support for 9.x, and NT 4.0
Search
Lexmark Tech Library (not automated! real search engine!)
Search for "Optra R Plus"
Optra R/R+ Engine Firmware ver. 43.94
MarkNet XL Firmware Flash
Optra 4049 Series Service Manual
Internal Network Adapters (INAs)
installing/adding
a network card option
Configure TCP/IP on MarkNet
XL INA
1402217 - Token Ring 16/4
1402218 - 10baseT ethernet only
1446702 - Combined
ethernet 10base2/T Use the same PCB
13A0295 - IPDS
Installing a font card/font
cartridge 1364915
installing
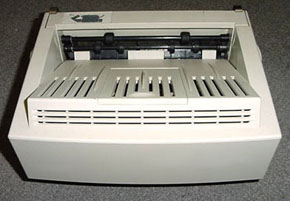
the 100-Sheet Auxiliary Feeder or the Envelope+ Feeder
Toner Cartridge
changing
the toner cartridge and using the fuser cleaner bar (felt pad)
Duplex Unit
installing
the duplex unit
Duplexor Sounds
Like Machinegun!
W95 Drivers
Hard Disk
Using 4039 Cartridge
Updating the engine
code on the printer (Flash ver 43.94)
Update INA Adapter
Flash
Calibration
Does Not Pick Up Paper
25 MHz AMD® 29030 32-bit RISC processor
The only two differences between the Optra
R and the R+ is that the R+ (as you noted) will print out at 16ppm whereas
the R will do 12ppm. The other difference is that the R+ offers collating
of multiple page print jobs on board the printer (not thru the software
on the p.c which is common now). The benefit is that it allows the
user to regain control of the p.c. more quickly. The toner cartridge
is the same for all the Optra's (monochrome)and you can buy it in either
7,000 pages or 14,000 pages (which is more economical). The add-on's
(duplexing, 500 sheet 2nd drawers, flash memory ...)will fit the whole family
of Optra machines range. The only exception is the dual paper feeder off
the back of the machine and that is designed for the Plus models.
OZONE: Ozone is an inherent by-product of many laser printing
processes, including the older IBM 4019, 4029, and 4028 laser printers.
The 3116 does not create any measurable amount of ozone because the charge
corona has been replaced with a charge roll.
The Optra Plus is the same engine and controller as the Optra, but
with a different P-SIMM. The Optra can be upgraded to a Plus by replacing
the P-SIMM in a kit from Lexmark.
expandable to 64MB (4, 8, 16 and 32MB) using 72 pin 70 ns SIMMs, FPM
and EDO supported.
RAMSmart intelligent memory management
100MB hard drive option
Flash Memory Option
Flash memory is useful for storing information like downloaded
fonts and macros. Information stored in flash memory is retained when the
printer is turned off and can be quickly retrieved by the printer.
Use the Toolkit utility shipped with your printer to download
fonts, symbol sets, or macros to flash memory. Refer to the Technical
Reference for more details about using your Flash Memory Option.
Flash SIMMs
Flash Memory 2MB
U40 69G3165
U41 Lexmark 1408773 |
U42 HN624116FB 1408759
U43 Lexmark 1381714 |
Flash memory options of 1MB, 2MB and 4MB
J7 ROM SIMM (flash memory option
1364923 1MB Flash SIMM
1364922 2MB Flash SIMM
1364879 4MB Flash SIMM
How
to format flash memory
From a Ready status message, press Menu> (right arrow) or <Menu
(left arrow) until Tests Menu appears on the display.
Press Select to select the Tests Menu.
Press Menu> or <Menu until Format Flash appears.
Press Select to format the flash SIMM.
Warning! Any existing data stored on the flash
SIMM will be erased when it is formatted
ROM SIMM (printer microcode)
U40 13A0101
U41 69G8990 |
U42 69G8989
U43 Lexmark 1381872 |
J8 ROM SIMM (printer microcode)
1381840 R/Rt/L/Lx/Rx
1381872 Lx+/R+/Rt+
Regular memory (J9 and J10):
1364921 2MB DRAM SIMM
1364877 4MB DRAM SIMM
1364876 8MB DRAM SIMM
1364875 16MB DRAM SIMM
1364874 32MB DRAM SIMM
PRINT RESOLUTION/MEMORY REQUIREMENTS:
PCL5 and PostScript Level 2: (On/Off refers to Page Protect)
Page Simplex Duplex Simplex Duplex
Simplex Duplex
DPI 300
300 600 600
1200 1200
ON: 4MB
4MB 4MB 4MB
12MB 12MB
OFF: 4MB 4MB
4MB 4MB 12MB
12MB
The standard 4MB of memory
will allow some 1200 dpi print jobs to print successfully. However,
an additional 8MB of memory is recommended for complex print jobs and to
increase the probability that most print jobs will print.
Font cards (bitmapped or scalable fonts)
1364915 Font Card Adapter
Adobe PDF Level Support
I had been having a helluva time in getting my R+ to print the
newer PDFs. A lot of "BUSY" with no output, documents failing within Print
Monitor, and "PRINT BUFFER" . Lots of weak swearing and re-installation of
drivers didn't fix it.
Try using GhostScript / GhostGum to convert the file from
PDF level 1.5 (Acrobat 6.x) to PDF level 1.2 (Acrobat 3.0). Once I did
that, my R+ started to accept and print at 10PPM in duplex.
Internal Network Adapters
(INAs) or Internal Option Port (IOP)
How to configure TCP/IP on the
Marknet XL through the printer Operator Panel ID: ENUS286
- Select Menus, More, Network Menu X (where
X represents the slot in which the network adapter
is installed).
- Select More, and then IP
Protocol.
Select More, and then Set
IP Address.
- Use the buttons next to the '+' and '-' keys to assign each
octet by moving upwards from 0 or decreasing from 255 to reach the correct
number.
- Use the button next to the right arrow to tab to the next
octet and then save the IP address when the correct number
has been added to each octet.
Repeat for the Netmask and Gateway.
For use with Wireless router (ex. WHR-G54S)
IP Address is the IP address of the printer
192.168.1.20
Netmask is generic
255.255.255.0
Gateway is the address of your router
192.168.1.1
1381050 - localtalk
1402217 Token Ring 16/4
J1 connection to RIP board
J2 DE9 TR port
J3 50 pin edgecard for?
U1 LSI L1A7648 1328481
U2 N80C186-16
U3,4 TC518512AF-80
|
U9 50G6144ESD 16/4 TR Iface
U11,12 CY7C188-25VC
U13 1333510 BIOS even?
U14 1333511 BIOS odd?
Y1 32.0000 MHz osc
|
1402218 10baseT ethernet only /
1446702 Combo 10baseT and 10base2
CR3 Activity LED
J1 connection to RIP board
J2 BNC (1446702 only)
J3 RJ-45
J4 50 pin edgecard for?
U1 LSI L1A7648 1328481
|
U2 N80C186-16
U3,4 TC518512AF-80
U9 AM79C940BJC
Y1 31.800 MHz osc
Y2 20.000 MHz osc
|
13A0294 - SCS (BNC or twinax, no cable adapter)
13A0295 - IPDS (BNC or twinax, no adapter)
D3 Unk
D4/5 CU / Share LEDs
J1 Pads for emulator port
J2 44 pin header
J3 Parallel/Serial cable
J6 connection to RIP board
J7 44 pin header
J8 44 pin emulator port
J11 BNC port
IC5 Xilinx XC3030-70
|
IC6 I960KA20
IC7 I961KA-20
IC8 72 pin SIMM
IC9 40.000 MHz osc
IC10 VLSI VY06282-2 Supercigar
IC12 BIOS? 30H3679
ST1 (BNC) three pin header
ST1 (IPDS) three pin header
ST2 (IPDS) three pin header
X1 18.867 MHz osc
|
The parallel/serial cable port is the funky "beam"
type used on the Server 500 backplane for the DASD Status cable header.
Mine had a Smart SM532512LP-7 with four NEC 424260-70 chips, two front, two
back. Pins 68 and 69 are grounded.
This card has IBM stickers all over. The actual manufacturer is idata
a/s, Denmark
IPDS Memory: 4MB or 8MB option.
1 IPDS memory slot on IPDS cards. 2MB is standard. The 2MB may
be replaced with the 4MB or 8MB option.
A change to the physical memory media type used on
the IPDS feature was phased in around the Jan/96 time frame. New machine
orders requiring additional IPDS memory should use Feature Code 4040 or 4050.
MES/Field upgrades requiring IPDS memory changes need to first determine
what level IPDS feature card is installed to determine which style memory
media type is required. One or two techniques can be used to determine
the IPDS feature card level:
1) Open the side of the printer and physically
measure the length of the IPDS/attachment card. If the card is approximately
6" to 6.5" in length, then the new media style is required and feature codes
4040 or 4050 should be ordered. If the card is approximately 8" in
length, then the original memory features are installed and feature codes
4304 (4 MB ASCII Memory) or 4308 (8 MB ASCII Memory) should be ordered.
2) By printing the IPDS PRINT MENUS, the micro-code level
can be found and used to determine which IPDS memory media type is required
(MENUS/NETWORK MENU 1/TEST MENU/PRINT MENUS). The second page that
prints out, is titled IPDS - MENU SETTINGS. Next to the "Firmware Version"
you'll find some numbers that reference the exact micro-code level.
Find the first number that has 106.XXX. If the .XXX is equal to or
greater than 004, then the new media style is required and feature codes 4040
or 4050 should be ordered. If the .XXX is less than 004, then the original
memory features are installed and feature codes 4304 (4 MB ASCII Memory)
or 4308 (8 MB ASCII Memory) should be ordered.
13A0296, 0297, 0298 SCS or IPDS adapters for DE9 to twinax, BNC or DE9
setup.
BTW, the rear envelope feeder that fits the 4039's in yukky green/olive
are the same thing as the pretty beige and blue ones sold for the 4049 Optras,
just different pigment in the plastic.
The envelope feeder will have a picture of an envelope on the feeder.
The 100 Sheet feeder will have a picture of a piece of paper.
1408893 Envelope+ Feeder
1364895 100-Sheet Auxiliary Feeder
Once you get a 10baseT card get the MarkVision software, setup
a network address, and then let the software auto-detect the options in
the printer. Less crap to deal with and you can tell hpw the print server
is responding with the printer.
Toner Cartridges
There are two toner cartridges for the Optra series. P/N 1382100
is a 7000 page cartridge (at 5% coverage). P/N 1382150 is a 14000
page cartridge (at 5% coverage). This single unit contains the drum and
toner supply. No other items are required. (Ed.
I have seen a Lexmark box with PN 1382650,
listing the Rx/+, Lx/+ etc. Replaces Part numbers 1380950 and 1382150. These
cartriges are/were 1380950's which are taken back by Lexmark and totally
reconditioned/ remanufactured)
These cartridges work with the Lexmark Optra R+, Optra Rn+,
Optra Rt+, Optra Lx+, Optra Lxi+, Optra Lxn+, 4039 10plus, 3112 and 3116
printers.
The R+ comes standard with collating on board so if
you are printing multiple copies of a duplexed report the Optra can handle
it. Operating cost; if you use the 7,000 page toner cartridge
the cost per page is about .03 cents. If you use the 14,000 page toner
cartridge the cost per page goes down to about .02 cents (that includes
paper0 you need not worry about additional parts that need to be
replaced because when the toner cartridge is replaced about 70% of
the print process is also replaced - thus assuring the user of consistently
clear, crisp output.
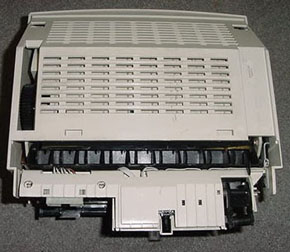
Duplex Unit
You MUST have both the duplex unit (part # 1408904) and the tray,
or it WON'T work!
Duplex Feed Unit P/N 1408904
The duplexor is very easy to remove/reinstall. The
printer software does "Plug 'n Play" on it. You have the duplexor itself
and a duplexor tray. Pull the standard tray out, put the duplexor tray in.
Remove the front exit cover, open the top cover, pop the two small plastic
guards that cover the guides where you hang the duplexor, "hang" the duplexor
on the printer. The biggest trick would be not losing the front exit cover
or the two small plastic covers while you are duplexing.
You really need the 500 sheet lower tray if you are serious
about big duplex jobs. The duplex tray can only hold 75 sheets. What I
do is store a different type of paper in the duplexor, and the plain paper
in the 500 sheet lower tray.
Duplexor Sounds Like Machinegun!
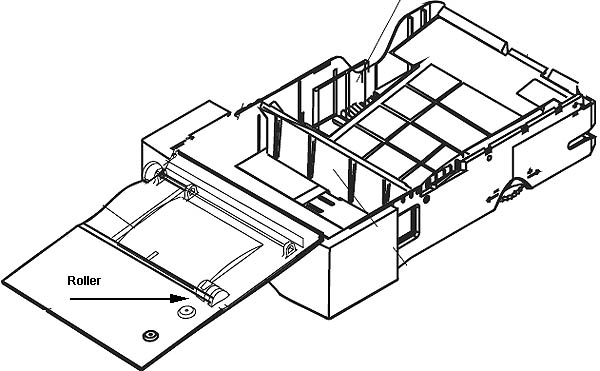
I was preparing to massacre another ream of paper when my
duplexor started to make noises like a gear was jumping. Puzzled, I unhooked
the motor unit, worked the gears, and didn't find a problem. Reinstalled
the duplex motor unit and tried to print. It rattled for about 15 (very long)
seconds before it set Error 23 and stopped.
Flipped open the top cover on the duplex tray assembly, and
I saw the roller had ripped apart and the chunk had jammed in the roller
opening in the top cover. The gear is well designed, where it is held in
place by spring tension, so if it's jammed for whatever reason, it can bounce
against a spring instead of grinding teeth. Good job, Lexmark!
When I find out the part number or source for replacement
rollers, I'll post it.
Envelope Feeder
All you do is remove the rear manual tray and slip this
in it's place, then plug the little cable into the Env/AUX connector and
the driver should auto-magically recognize it. If not cycle the power
and it should then.
Jeffrey M. Wells wrote:
I'm not certain if this pertains to the LJ5L, but I just
bought a Lexmark Optra R+, a bad-ass machine to be sure. After a week
or so, I tried an envelope in the manual feeder, letting it exit out the
front tray. This printer began making a loud clicking noise, as if
someone were inside with a tackhammer, very periodic, about five clicks per
envelope. These clicks were strong enough to rattle my desk.
I called Lexmark and they told me that this was a FEATURE, called "Envelope
Enhance". The fuser rollers exert about 25lbs of pressure during a
print cycle and air bubbles can build up in envelopes causing wrinkling -
but the "Envelope Enhance" feature fires a solenoid which releases the fuser
bar for a split- second four or five times per envelope to make sure no air
build-up occurs. Envelopes printed on my LaserJet III do invariably
wrinkle in one corner, but the Lexmark prints them perfectly so it seems to
work, but it sounds like the thing is about to croak! It turns out that
if I feed a regular sheet of paper in the manual tray before telling the
printer it is a normal sheet (through software) and not an envelope, it will
assume that it is an envelope (just to be safe, I guess) and begin its clicking
- so if I did a lot of manual feeding, I would hear it often.
Envelope steady state print rate is slightly reduced because
of the heavier demand toward keeping the fuser hot. After a certain number
of envelopes are processed the print speed reduces by about 50%. An envelope
does not pass across the full width of the machine's fuser, therefore the
portion of the fuser that is not cooled by passing the envelope will continue
to heat.
Win95 Drivers
Gary R. Webster wrote:
Windows 95 does not support 32-bit printer drivers.
Lexmark does, however, have two packages on our bulletin board, ftp site,
and web site which contain 16-bit PostScript printer driver files, written
specifically for Windows 95. The package names are MPWN95AE.EXE and
MPLX952E.EXE. These packages are different from the previous 16-bit
packages that worked in Windows 3.1x.
MPWN95AE.EXE contains the .SPD files for use with Microsoft's PostScript
driver (PSCRIPT.DRV) which ships with the operating system. There
is also a readme.1st file which describes how to install the printer driver
for your printer.
MPLX952E.EXE contains Lexmark's custom PostScript Level 2 printer
driver (LEXPS). This package will contain all of the files necessary to
install that driver. There is a file in the package called readme.1st
which contains a list of all of the files that will be installed for this
driver. This file also contains information on how to install.
Hard Disk Option 1381856 100MB, (40MB Drive No Longer Available)
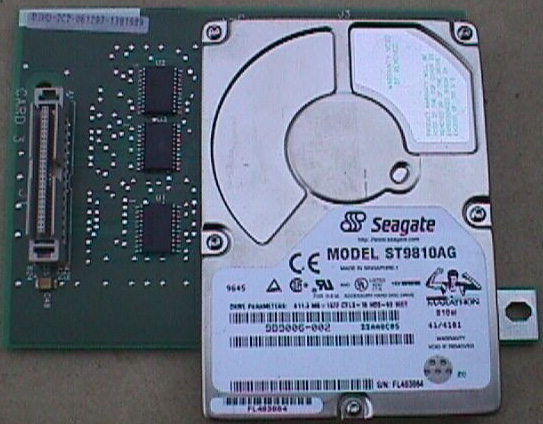
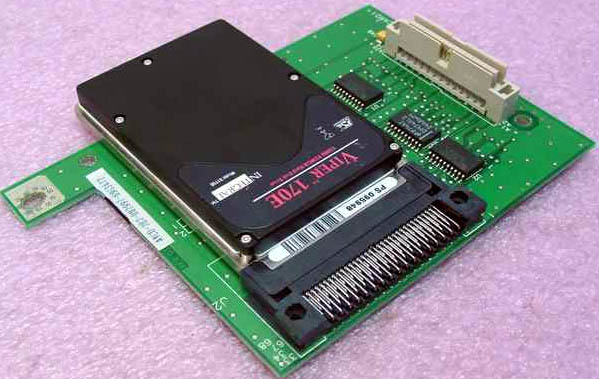
Supports up to 1,023KB on the Optra, Optra Plus (firmware level up through
52.29).
I found my Hard Disk option on ebay, popped it in, and was hit
by Error 64 Defective Disk. I tried reseating it in the carrier, but
it refused to clear. I then swapped it out and installed a 100MB Type II
PCMCIA drive (originally for a 730 TE), and powered back up. Then it displayed
Error 63 Unformatted Disk, I cycled to Test Menu, then to Format Disk, hit
the button, and now it works.
Error 64 Defective Disk
The printer has determined that the hard disk is defective.
- Power the printer off and reseat the disk.
If the message is displayed again when the printer is powered on, replace
the hard disk.
Note: If the disk is deemed defective
by the printer, then you will not have "Format Disk" available under Test
Menu. It may be that the drive has had the MBR corrupted or the HD comes
from a non-PC environment. You may be able to get the HD to work by formatting
it on a computer (FAT) then trying it.
Error 63 Unformatted Disk
To use the disk:
- Format the disk (see below).
- Send the data again.
The Format Disk menu item only appears when the
printer detects that a Disk Option is installed. Formatting
deletes all resources stored on the disk and prepares the disk to receive
new resources. The Format Disk option can be found in the
printer's Test Menu.
Warning! If you select
Format Disk and then Continue, any
data stored in the disk is lost. Do not turn off
the printer while the disk is formatting.
Optra Printer Using a 4039 Cartridge
Beginning with engine code level 43.74, 4039 cartridges
will now print in Optra machines.
*The 4039 cartridge is generally not recommended
for use in Optra, especially not for 1200 dpi applications. For heavy graphics
use, continue to use the Optra toner cartridge for the best print quality.
*The 4039 cartridge may be used for some special applications,
such as label or cardstock printing. Also, it is important to use the 4039
fuser wiper that comes packaged with the 4039 cartridge.
*Machines that have earlier code levels may have the new
code flashed to upgrade them.
Use a 4039 print cartridge (part number 1380850 or 1380950)
in Optra and Optra plus laser printers that are dedicated to printing labels.
Machine engine code level 43.74 or higher is required to use the 4039 cartridges
in your Optra and Optra plus printer. Print the menus page from the Tests
Menu to determine the level of engine code installed in your printer.
Calibration
Timo Autiokari
The Optra R+ (and most of the Lexmark new PS printers) *can*
be calibrated. It is easy, one only needs to send the calibration data
as a PostScript file to the printer, there after the printer is calibrated
until it is powered off. If the printer has a flash memory card or a hard
disk the calibration can be written in either and it will be persistent until
it is changed.
Howard C. Cochran
I would like to point out that Lexmark laser printers are
designed to provide a nearly linear gray curve, so long as one of the printer's
builtin halftone screens is used.
In Mr. Autiokari's case, he configured the driver for a
higher screen frequency of 130 lpi. Such user-defined screens are
uncalibrated, so they can appear dark due to dot gain. If you stick
to the printer's built-in screen, calibration is generally unnecessary.
Update Engine Code on Optra R+
Background
If something has happened to the engine code
stored on the printer engine board, or if you have an older code level
on your printer, it is possible to send new code to the printer without
having it serviced. In order to be able to send new engine code to the
printer, you will need the following:
- a direct parallel connection using
a PC with command prompt access.
- a network connection to the printer
Downloading the Code
- Download optengn.zip.
- Save optengn.zip
to a directory of your choice.
- Extract the zipped file to an easily
accessed directory.
- Read the Readme file
for full instructions on how to flash the file over to the printer.
Downloaded Files
P4394-12.PJL -
This is the engine code for the Optra R and L only (the 12 page per minute
printers).
P4394-16.PJL - This is the engine
code for the Optra Rx, Lx, Lxi, R+, Rt+, Rn+, Lx+, Lxn+, and Lxi+ only (the
16 page per minute printers).
README.1ST - This is a text
file explaining installation from diskette.
Installing the Engine Code
The installation directions in the engine code file are as follows:
-
Go to a DOS
prompt.
-
Change directory
to the one containing the engine code files.
-
Turn the
printer on and make sure it is connected and in the Ready state.
Note: Make sure you are using a high quality
(IEEE 1284) 6 foot cable or Lexmark's 10 foot cable.
-
Type the
following command, depending on which OPTRA you are updating:
OPTRA R or L: Copy P4394-12.PJL /B LPTx
OPTRA Rx,Lx,Lxi,R+,Rt+,Rn+,Lx+,Lxn+ or Lxi+: Copy P4394-16.PJL
/B LPTx
Note: The
in the above commands represents the port to which you
are copying; this port can be physical, redirected, or captured.
-
The printer
display panel should read Programming Engine Code.
Note: Do not power off the printer or touch
any menus during this operation. If the printer does not return to Ready
after 15 minutes, it is safe to turn the printer off and back on.
-
When the
printer returns to the Ready state, print the menu settings page. To print
the menu settings page:
-
Press the
button next to Menus.
-
If you
do not see Test Menus, press More until
you find it. Now select Test Menus.
-
Press the
More button until you find Print
Menus. Select Print Menus.
-
The appropriate
updated engine code should be displayed in the bottom right corner
of the menu settings page. Make sure the engine code on this printer
has been updated - that is, an engine code level of 43.94
should be displayed.
Using a TCP/IP or network connection
You can also attempt this upgrade using
a TCP/IP or network connection, provided you know the TCP/IP address of the
printer. Note: Lexmark recommend
upgrading the engine code using a direct parallel connection whenever possible.
To perform the engine code upgrade using a TCP/IP or network connection:
- Go to Start, Programs,
MSDos Prompt.
- Change to
the directory that contains the engine code file.
- Type ftp (address) and then press ENTER twice.
For example: ftp 157.184.29.127
- Type
bin and press ENTER.
- Type
put (depending on which
OPTRA you are updating) and press ENTER.
For the OPTRA R or L, type: put P4394-12.PJL
For the OPTRA Rx,Lx,Lxi,R+,Rt+,Rn+,Lx+,Lxn+ or Lxi+, type: put P4394-16.PJL
The printer should now read Upgrading Engine Code.
Update INA Firmware to 79.135
INA_XL.EXE INA firmware version 79.135
This document assumes the firmware revision has already been downloaded
and expanded on the local hard drive. For a list of which firmware extensions
go with which adapter, refer to the list at the end of this document.
Flash memory is a type of ROM (read-only memory) that can be electronically
erased and reprogrammed. The flash memory in the network adapter contains
the firmware that operates it. This firmware communicates with the network,
the printer, and the network utility. When the firmware is updated,
the flash memory on the network adapter is reprogrammed. This
procedure overwrites old firmware and replaces it with the upgraded version.
Although many adapters can accept each firmware file, there are some intermediate
levels that must be reached before the adapter can accept the current level,
as explained below.
- The MarkNet S adapter must be flashed to 1.9.14 before it
can accept any higher level of firmware.
- The MarkNet Pro adapters must also be flashed to 2.9.14 before
it can be set to the current level.
- When a PJL file is flashed, the intermediate level is
not necessary.
- The MarkNet XL must be flashed to 15.84 before it can be
flashed to 79.* levels.
Warning!
While the code is being updated, be careful not to turn
the adapter (or printer) off!
After reprogramming, all of the network adapter's settings
should be saved; however, this is not always the case. Be sure to print
a network settings page before starting the procedure in order
to compare it with network settings after the firmware update.
From Windows
From most Windows operating systems as well as OS/2,
MarkVision Classic and MarkVision Professional can be used to
update the print server firmware. Firmware can also be sent using a TFTP
session from Windows NT, 2000 and XP. For the MarkNet S series, N series,
Pro series, and X series adapters, the internal web interface is another
option for updating firmware. Some adapters also accept PJL files
which can be sent via FTP and over a parallel port.
- This document
outlines MarkVision update procedures.
- This document
provides information on the TFTP procedures.
- This document
provides information on the web interface update procedure.
- This document
provides information on updating with a parallel connection.
Via FTP
For adapters that support PJL files, an FTP session can
be used to update print server firmware. First download and expand
the PJL file to a local directory on the hard drive. This file is usually
available for download from our FTP site as
*pjl.exe under the firmware directory for each adapter.
It is useful to start the FTP session from within the directory where the
PJL file has been saved. For example, if you were upgrading
a MarkNet Pro adapter to 1.10.17 code, and the 1_10_17.pjl flash file was
in the C:\inaflash directory, you would perform the following steps from
a command prompt:
- From the C:\inaflash directory, type ftp <ip address>
replacing the words in brackets with the IP address of the adapter.
- Press ENTER. A Connected status message
should appear, prompting for a login ID.
- Press ENTER to log in as an anonymous user.
- Type bin to set up a binary transfer.
- Type put <filename.pjl> where <filename>
is the PJL file from the Lexmark site. Press ENTER.
- When the transfer is complete, type bye to exit the FTP session.
Important! These commands
should be implemented quickly as the FTP session may time out.
A connection closed by remote host error indicates that the
session has timed out and must be initiated again.
Paper Does Not Pick Up from Tray
If you are experiencing the problem that the paper does
not pick up from the paper tray, you probably need to replace the rubber
band-like part that grabs the paper. You can fix it yourself. Just order
part 69G5480 for the built-in paper tray, or part 1039540 for the optional
extra tray. You will get extra parts with the 69G part, but that's the
only way to order it.
Transparencies
Lexmark has a new transparency that is exclusively
for Optra 4049 printer cartridges. It is made by 3M Company with the Lexmark
name and part number -- 1402810 (8.5 X 11), and 1402809 (A4).
This particular foil will NOT be recommended for 4019,
4029 or 4039 printers. It has been thoroughly tested and approved by 3M
and Product Assurance and shown to provide high quality for the demands
of our Optra customers, even with 1200 dpi.
|