|
Kingston.dsk (in LOADDSKF format)
Kingston.zip (ZIP format, of course)
SXNOW.EXE SX/Now! Utility Diskette v2.04
KTCCACHE.EXE Latest KTCCACHE utility for SX/Now! (8/92)
Note: xx below denotes operating speed of the upgrade. It can be 20, 25, or 33 MHz.
SXxxGAM Models for PGA (Pin Grid Array socket) systems like the Model 50 and 60.
SXxxLEM Models for the Model 25 and 30 286 computers (PLCC socket)
SXxxLCM Models for the Model 50Z (PLCC socket)
Thoughts on upgrading
Installing the upgrades
Math Co-Processors
This page discusses the various Kingston SX Now! upgrades that can be used in a PS/2 computer system.
Note: While many computer manufacturers used a pin grid array (PGA) package form of the 80286 CPU, IBM used a PLCC type in the Model 25-286, 30-286, and 50Z. Other 286 based PS/2s (the Model 50 and the Model 60) utilized PGA processors.
For all these upgrades, you will need to download the Kingston Utilities Diskette to obtain the benchmark program and cache enabler. I have it here in two formats, IBM's "LOADDSKF" and ZIP format. The "LOADDSKF" format requires a low density diskette to extract. If you don't have a low density diskette or would rather not mess around with finding one, use the ZIP format provided. For the LOADDSKF file, you will need LOADDSKF.EXE, available here.
The PGA format, being the most common, was what most manufacturers offered 286 > 386SX CPU upgrades for. So far, I have only seen Kingston SX Now upgrades designed for use in a PLCC socket. I am unaware of any other manufacturer outside of Kingston that produced them in that format.
The upgrades came in several speeds: 20, 25, and 33MHz. They also came in several different orientations to fit differences in the 25/30-286 and 50Z planars. An explanation of each upgrade and its intended use is below.
Based on content by William R. Walsh (original HERE). Edited by Major Tom.
David L. Beem contributed all the SXNow! outlines.
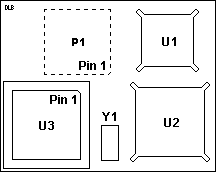
SXxxGAM Models
The SXxxGAM SXNow! upgrade is the basic PGA version. It fits the Model 50 (no Z) and 60 only.
 |
 |
| (top) |
(bottom) |
Pictures are of the "GAM" Model Revision D1.
P1 PGA Connector Plug
U1 AMD 386SX @ 20, 25, or 33 MHz
U2 Austek A38202SX Microcache Controller (or equivalent)
U3 80387SX-xx Math-Coprocessor socket
U15 Toshiba TC55187T-25 (is this right?)
Y1 CPU OSC - double the frequency of the CPU
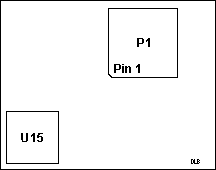
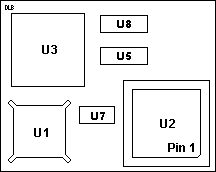
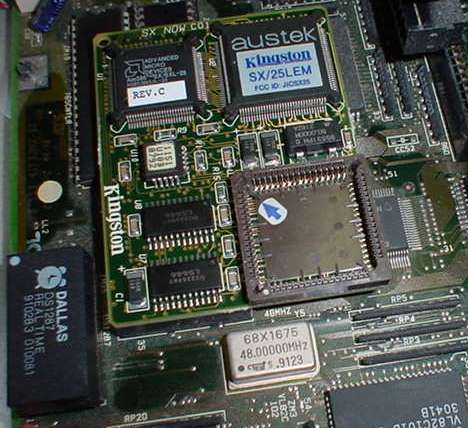
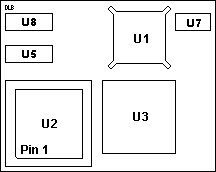
SXxxLEM Models
 |
 |
| (top) |
(bottom, is this right?) |
Pictures are of the "LEM" Model Revision D.
P1 68 pin PLCC Connector Plug
U1 AMD 386SX 20, 25,or 33MHz CPU
U2 80386SX-xx Math-Coprocessor Socket
U3 Austek Microcache Controller or Equivalent
U5 Cache
U8 Cache
U15 Toshiba TC55187T-25 (is this right?)
U7 CPU Clock Oscillator - double the speed of the CPU
The SXNow LEM model is used on the 25-286 and 30-286 systems. It is designed exclusively for those systems, and will not fit correctly in the 50Z.
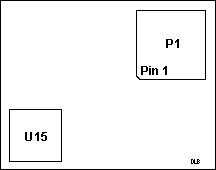
SXxxLCM Models
 |
| (top) |
The picture is of the "LCM" Model Revision D.
This upgrade fits the PS/2 Model 50Z. Note that it will not fit into the Model 25-286 and 30-286. The Dallas clock module gets in the way.You must use an LEM model in 25 and 30-286.
U1 AMD 386SX 20, 25, or 33 MHz
U2 80387SX-xx Math Coprocessor Socket
U3 Austek Microcache Controller or equivalent
U5 Cache
U7 CPU Clock Oscillator - twice the speed of the CPU
U8 Cache
Thoughts On Upgrading
These upgrades all install into your System's PLCC (PGA in the case of the GAM model), after you have removed the orignal 286 CPU. Keep the 286 CPU, in case you have to revert back to a 286 configuration or the upgrade doesn't work right.
The upgrade has onboard cache. However, the planar will not enable this cache automatically.
The cache is where the upgrade gets a lot of its speed. Without it enabled (by means of the enabler program) your system may actually run more slowly than it did with the original CPU installed. In fact, when I installed the LEM upgrade into a Model 30-286 (8530-U42) the benchmark told me outright: It said the system was performing like a 10MHz AT with the original 286 installed. With the 386sx upgrade installed and the cache disabled, it said the system performed like a 7MHz AT. Finally, with the upgrade installed and cache enabled, I got all 25MHz of performance as per the included benchmark.
Personal note: I find it hard to believe the cache made that much difference alone. I'll bet that the program may also enable the onboard oscillator rather than depending upon the system oscillator to drive the CPU at its rated speed.
Note: David Beem sent me an upgrade for a Model 50Z and after installing it into a 50Z with the 8514/A video adapter, I noticed the video redraw was slightly slower than it was with the original 286. After asking him, he thinks it may have to do with various wait state differences in the systems that the faster speed of the upgrade would make necessary.
Installation
Disclaimer: You do this at your own risk. I disclaim all responsibility for any damaged hardware, inaccurate results or totally screwed up systems.
Run the included benchmark program before upgrading if you want. It just might be interesting to know where your CPU stands. Although by no means a final statement on your system's performance (see Note above) it gives you a more tangible idea of where you are and where you are going to be.
1. Disconnect all power and data cables from your PS/2 after turning it off. Insure that all diskettes are removed from diskette drives. Backup your hard disk if you desire--there is a small chance your system could be really unhappy after this upgrade and it would let you know...
All pictures show the installation of a PLCC type upgrade. PGA upgrade users, take note: The same instructions usually apply, but you may have to make some minor adapations, especially for removing the chip.
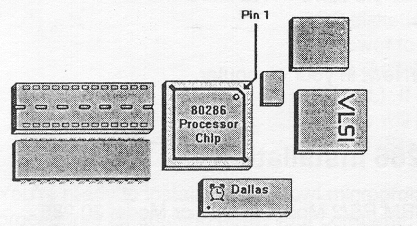
2. Locate the 286 CPU.

Picture ©1991 by Kingston Technology
Note the orientation of Pin 1 before you remove the CPU as shown above. All pictures specifically apply to the LEM upgrade model, but they can be used as a guide for other systems.
Images ©1991 Kingston Technology
Basically, you are looking for the bevel and circular indentation on your 286 processor. PGA processors usually have a dot and beveled corner indicating pin 1.
3. Using a PLCC device puller as shown above, carefully grip it around the CPU and pull up firmly.
Set the CPU aside, and if you have an 80287 math-coprocessor installed, remove it carefully as well. A flat bladed screwdriver is useful for this task. Start the 287 at one end and work back and forth until the chip is free. It is not compatible with the Kingston upgrade, so make sure the 287 is removed!
If you do not have a PLCC puller try and get one if at all possible. If you cannot get one, a very thin screwdriver inserted into the "notches" on each side of the 286 CPU socket may work, but be careful as the socket plastic is thin and may break. For PGA socket users, a very flat bladed screwdriver inserted at each of the chip/socket combination and twisted slightly will remove the chip.
When you remove the original 286 CPU: PLCC upgrade users can pretty much store the old 286 CPU anywhere that's static free. For PGA upgrade users, press the original 286 into a block of foam and put that into an anti-static storage bag. Don't use a foam block that sticks to everything in sight, it is full of static and could ruin your original 286 CPU.
4. Ground yourself as a precaution against static electricity. Ground the anti-static package the upgrade is in. Carefully remove the upgrade and locate pin 1. Make sure that pin 1 on the upgrade and pin 1 on the CPU socket are aligned.
5. Press the upgrade firmly into place.
Warning! The upgrade does require a firm press to be inserted into the socket. However, if you're about to want to hammer it into place, stop! The pins are hard to align perfectly with the ones in the socket, and the upgrade will be the loser in the fight! You will break it if you force it. I almost did break one such upgrade while installing it into a 50Z! It took a lot of diddling around to fix the pins. Kingston used a rather odd method of assembly on these. The PLCC pins descend from the main board and are anchored on a kind of dropped-down "daughtercard".
Warning! Users of a PGA (pin-grid array) version should be on the lookout for bent pins, especially with a secondhand CPU.
6. With the upgrade installed, power the system on and watch carefully. If the system won't power on, there are sparks/smoke, the system doesn't come up, or irritating relatives come over (the last one is a joke!) shut it down immediately. Check your installation of the upgrade, make sure Pin 1 on the upgrade is matched to Pin 1 on the CPU, and that the upgrade is in firmly. If you forced the upgrade in, try pulling it gently out and making sure no pins are bent or broken. If none are, put the upgrade back in and try again.
Don't expect that the upgrade will be alive if you let "the magic smoke" out. You may get extremely lucky and the upgrade will have survived, but don't bet the farm on it.
7. Once the system is up and running, you may need to use the reference disk, as certain systems notice the processor change. After that, get the KTCCACHE.EXE file and run it, or put it into your AUTOEXEC.BAT file to run automatically at startup.
Run the benchmark program if it was included with your upgrade, and note the performance increase. If need be, you can disable the cache on the upgrade by typing:
ktccache -d
Turn it back on with:
ktccache -e
Note: As per the manual, if you ever pull the upgrade out, and replace the 286 CPU, you do not need to remove the cache program. It will load, but it will not do anything. It does not require additional RAM, all it does is to enable or disable upgrade cache. After that it terminates.
Windows 3.10 Users
If you were using Microsoft Windows 3.10 prior to upgrading, you will need to reinstall it in order to gain the ability to use 386 Enhanced Mode. You don't have to delete your current Windows installation, simply reinstalling Windows over the existing installation is sufficient.
Windows 3.0 may require a reinstallation as well if you want to use 386 Enhanced Mode. I haven't tried this.
Windows 3.11 officially requires an 80386 CPU, so you'll have to install the upgrade before attempting to install this version of Windows.
Math Co-Processors
If you were using an 80287 math co-processor with your 286 CPU, you may wish to install an optional 80387SX math co-processor on your SXNow! upgrade. Unlike some upgrades offered on the market, you cannot continue to use an 80287 if you have one. The SXNow! upgrade is designed to cover the 287 socket. In fact, you probably won't be able to insert the card fully if there is an 80287 in place.
You should try to match the speed of the 386SX processor on the SXNow! upgrade. However, if a math-co that is an exact match to the speed cannot be found, you can safely use a co-processor that is one step below the speed of the SXNow's CPU speed. On a 33MHz SXNow, this would mean that you could use a 25MHz 80387SX. It is also possible to do the opposite and use a faster part in a slower system.
Since overclocking a math-co results in more stress on it, you may want to consider placement of a heatsink on the coprocessor chip. It is probably best to use a small heatsink--one with a very short height, especially in the 50Z where the upgrade comes very close to the installed option cards.
Note that your mileage may vary. I've always been able to overclock many different math co-processors without incident. If you do this, run diagnostics on your co-processor to be sure it is producing accurate results. If your system is under any kind of extended warranty, service contract or maintenance agreement, you probably should not use parts that don't match the specifications of your computer. Doing so could void such an agreement if you have one. (Yeah, it's unlikely for a 386SX-based system, but one never knows...)
|