|
* To tell if
you have an X-C 6250 Pro 300, look at the string of letters labeled 'CONFIG'
on the bottom of the unit. If the second letter is 'C' then you have an X-C
6250 Pro 300.
* To tell if
you have an X-C 6250 Pro, look at the string of letters labeled 'CONFIG'on
the bottom of the unit. If the second letter is 'B' then you have an X-C
6250 Pro.
* To tell if
you have an X-C 6250, look at the bottom of the unit. If it has 6250 on the
label, then you have an X-C 6250.
Xcpb125.exe Latest BIOS for X-C
6250 (200 MHz or less)
readme.txt
README.TXT contains additional release information.
Xcpmf001.exe US modem firmware for
X-C 6250Z
readme.txt
README.TXT for Xcpmf001.exe
WIN95Y2K.EXE W95 patch to
fix Y2K problems with DATE and DIR
Y2KW95.TXT
README.TXT for WIN95Y2K.EXE
XC 6000 BIOS 1.19 Win95 11-19-2002
XC-6250 BIOS 1.27 11-19-2002 Win95
XC-6250 Pro BIOS 2.14 11-19-2002 Win95/98
XC-6250 Pro 300 BIOS 3.03 11-19-2002 Win95/98
97-0055 - X-C 6250 Pro Computer Power Management
97-0053 - Practical Battery Tips
97-0052 - X-C 6000 Replacement Battery
Packs
97-0051 - Cradle Contact Cable Assembly
Replacement Procedure / BellSouth Units Only
97-0050 - External Chargers
97-0049 - X-C 6250 FCC Compliance Labels
- BellSouth Units Only
97-0048 - XCPOWER User Guidelines
97-0047 - X-C 6250 RF Antenna Placement
97-0046 - X-C 6250 Vehicle Cradle
97-0045 - Telephone Line Testing
97-0044 - Testing Application CPU Usage
to Reduce Power Consumption
97-0043 - Touch Screen
97-0042 - Surge Protection
97-0041 - Screen Savers and Power Consumption
97-0040 - AC Power Adapters
97-0039 - X-C 6000/X-C 6250 Vehicle Cradle
97-0038 - Battery Messages
97-0037 - Preventative Maintenance
97-0036 - Battery Memory and Charge Parameter
Messages
97-0031 - Battery and Display Operating
Temperature Characteristics
Die-cast Magnesium casing with additional rubber shock absorbtion,
meets MILITARY standards for Water, Drop, and Shock protection!
Model XC 6250
Pentium 133, 200 MHz
16- 48Megs of ram
10" 800x600 Monochrome Display w/Touchscreen
2.0-3.2 GB slim-line 9.5mm HDD, surrounded by extra shock-protection rubber
Built-in 33.6k or 56k modem
2 PCMCIA slots
VGA port
Accurite Floppy Drive *- the
Itronix BIOS searches for the firmware on this PCMCIA card
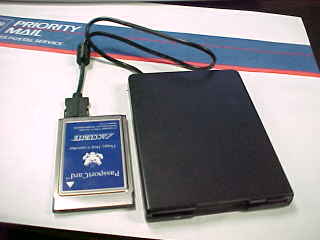
The Travel
Floppy can be connected to virtually any DOS, Win3.x/95/98/ME, 2000 and
NT 4.0 compatible notebook, subnotebook, or palmtop by simply inserting Accurite's
custom floppy disk controller, the PassportCard™. The PassportCard is a PCMCIA
Type II form-factor card meeting release 2 of the PCMCIA standard.
The PassportCard
features data transfer rates up to 1 Mbps and meets the PCMCIA release 2.10
specification with a Type II physical format. Software drivers provided with
the PassportCard allow full support of standard IBM type flexible disk drive
and diskette format configurations including 3.5" 720K, 1.44 Mb and 2.88Mb,
as well as 5.25" 360K and 1.2 Mb.
To be able to boot off a floppy, you will need an accurite tavel
floppy pcmcia floppy drive. They make a special version for the
Itronix XC. You boot with the card inserted but the dongle is not
attached. then you attach the dongle and it boots off the floppy.
Brad Baker writes:
The Travel Floppy PassportCard (PC Card controller) contains
the Windows 95 drivers for the Travel Floppy. The Windows 95 drivers must
be copied to the C: drive of the Libretto 50.
The PassportCard acts as an SRAM card when the Travel Floppy's
cable is not attached, however, the Libretto 50 must first be configured
to read an SRAM card in order to read the drivers.
1. Follow the Windows 95 Software Installation instructions
steps 1 through 3 on pages 14 and 15 of the Travel Floppy User's Manual.
2. Prior to going to step 4 do the following:
2.1 From the Win95 desktop click on START, then
click on RUN.
2.2 Type "SUBST A: C:\WINDOWS\SYSTEM" without the quotes
and click OK.
3. Insert the PassportCard without the Travel Floppy cable
attached.
4. The "Update Device Driver Wizard" menu appears. Click NEXT.
5. The message, "Windows was unable to locate a driver for
this device" appears. This is OK. Click on FINISH.
6. START>SETTINGS>CONTROL PANEL>SYSTEM
7. Click on DEVICE MANAGER.
8. Click and open "?OTHER DEVICES".
9. Double click on "?!Memory Card Device (MTD-0002).
10. Click on DRIVER from the Memory Card Device (MTD-0002)
Properties window. Click on "Update Driver".
11. Check the "No, Select Driver from List" button. Click
NEXT.
12. Select "Memory Technology Drivers (MTDs). Click NEXT.
13. Select SRAM Memory Card. Click FINISH. Wait for beeps.
Close all windows and get back to the Windows 95
desktop.
14. Proceed with steps 4 through 16 in the Travel Floppy User's
Manual.
AC Adapter, Charger, and Battery
|