|
Images and most of the text is © 1996-1997 Itronix
Corporation
XC95TOOLS ver
308
Pen Services for
Win95 ver 2
Xcpb125.exe
BIOS v.1.25 for XC-6250 (200MHz or less) readme.txt
BIOS127.exe
BIOS 1.27 for XC-6250 (Thanks to Andy Blakely!)
BIOS
1.19 BIOS 1.19 for XC-6000
Xcpmf001.exe
Modem Firmware v0.01 US firmware version for X-C 6250Z readme.txt
WIN95Y2K.EXE
Win95Y2K Patch for DATE, DIR, and File Manager Y2KW95.TXT
XC 6250 Case
Key Combinations
Power On / Off
Backlight
Contrast
Volume
Numlock / Insert
Move on Screen
Restart
Access System Configuration Utility
(aka BIOS)
Boot from
Accurite Travel Floppy
Displays
Use External Monitor
Select
LCD/Both/CRT under W95
Using Touch Screen
Calibrate Touch Screen
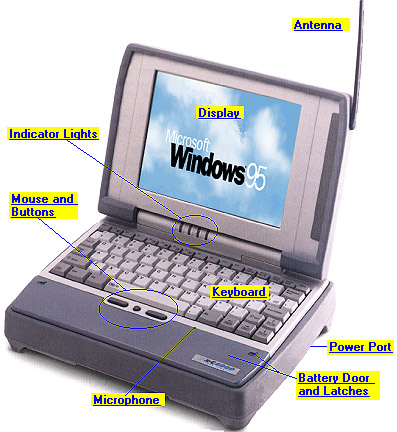
Indicator Lights
Connect Mouse
Enable Comm Port
Clean Cradle Contact Pins
Use Internal Modem
XC 6250 Case
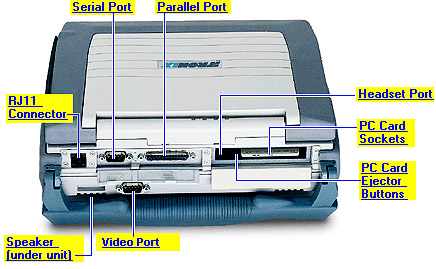
On my 133MHz unit, there is no Headset Port.
Keyboard
Basics
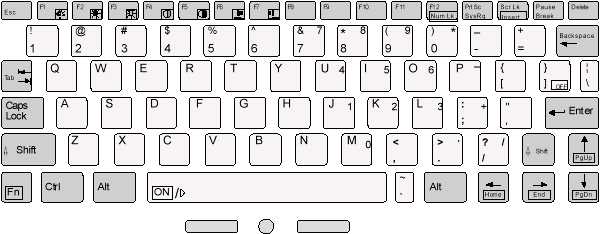
On the mobile computer, you must press the FN key in combination
with other keys to perform various tasks. These keys are labeled with the
command inside a box. For example, to turn on the computer, press FN+ON
(FN+SPACEBAR).
On / Off
FN+SPACEBAR Turn the computer on FN+ON
FN+OFF Turn the computer off
Backlight
FN+F1 Backlight on / off (backlight
is always on for color displays)
FN+F1 Toggle MaxBright on / off
(Only on 10.4" color display)
FN+F2 Dim the display backlight
FN+F3 Brighten the display backlight
Contrast
FN+F4 Lighten display contrast (Not
active on 10.4" color display)
FN+F5 Darken display contrast (Not
active on 10.4" color display)
Speaker Volume
FN+F6 Decrease the volume
FN+F7 Increase the volume
NUMLOCK / Insert
FN+F12 Toggle NUM LOCK on and off FN+NUM
LK
FN+INSERT Toggle Insert mode on
and off
Move On Screen
FN+PGUP Move up one screen
FN+PGDN Move down one screen
FN+HOME Move to the beginning of
a line
FN+END Move to the end of a line
Restarting
Computer
Caution! You can restart your
computer; however, restarting the computer while you are running applications
or while you are working in Windows may corrupt files.
CTRL+ALT+DEL Reboot the computer
Hold down both mouse buttons for at least
ten seconds and then release the buttons. Reset the computer
Access System Configuration
Utility (SCU or commonly called "BIOS")
Press CTRL+ALT+S as soon as the following appears: "<CTRL+ALT+S>
to enter System Configuration Utility."
Boot from
Accurite Travel Floppy
Finally figured it out. Laptops4students was selling these,
and I picked one up. This is a combo PC Card (Passport Card) and external
floppy. The web page is HERE
.
Insert the Passport Card Without
the Cable Attached!
From the instruction sheet from Laptops4students- Now after
POST, you will see:
---------------------------------------
Accurite Technologies, Inc.
Travel Floppy Boot v. 1.0.1
---------------------------------------
Connect Drive Cable and Insert Diskette
Press Any Key to Start Booting (Ed. where
is Any key? Next to Alt?)
Plug in the cable to the external floppy ( hint, have the silver
side of the plug facing up). Have the bootable floppy in the drive. The
screen will display
BUSY Loading Operating System
If the external floppy is connected to the Passport Card during boot,
you will be unable to boot from the floppy, but it will still work normally
for everything else.
Displays
· Monochrome: 8.2" VGA or
a 10" SVGA, 64 shade gray scale screen
· Color: 8.4" 640 x 480 or
a 10.4" 800 x 600 pixel resolution
· Touch screen: a resistive
analog matrix with 1000x1000 pixel resolution (154x204 dpi).
Using an external
monitor
The "Display Selection" feature allows you to switch between
the computer display, an external monitor, or both as the active display.
To use an external monitor, first connect the monitor cable to the 15-pin
video port on the back of the computer. (Ed.
I think this is under W95 only. The POST does not display on my external
screen.)
To select
a display Under W95
1. Start>Settings>Control Panel>Display>"CHIPS" tab.
2. Select one of these options:
"CRT" to use the external monitor
"LCD" to use the computer display
"Both" to use both displays
3. Choose OK.
4. Choose OK again when the display change message appears.
Using the
Touch Screen
· Always use an approved stylus.
· Never use sharp, hard, or abrasive implements on the touch
screen such as ball point pens, pencils, or keys. They could damage the
screen.
· To clean the touch screen panel, apply a household glass cleaner
to a soft, clean, dry cloth and wipe the screen.
Calibrate
Touch Screen
If you cannot select objects accurately with the pen, you may need
to recalibrate the touch screen.
To calibrate the touch screen
Control Panel>Pen>General>Align Now button.
Follow the instructions on the screen to calibrate the touch screen.
Indicator Lights

On/Off light On when you turn on
computer; blinks with low battery.
External power light On when external
power is connected. Blinks while external power supply is charging battery
and remains on when battery has completed charging.
Disk activity light Comes on when HD is
spinning or processing data.
Radio on/off light If you have a
radio modem, this comes on when the radio modem is powered on. When computer
is off, the light blinks if a message is waiting.
Connecting an
external mouse
1. Connect the mouse to the serial port on the back of the computer.
2. Start Menu>Control Panel>Settings>Mouse.
3. Select the General tab>Change.
4. Under "Manufacturers," select the appropriate mouse you intend to
use.
5. Under "Model," select the appropriate model.
6. Choose OK.
7. Close all windows and then enable the communication port.
Enable the communication
port
1. Start Menu>Shut Down>"Restart the computer."
2. Press Ctrl+Alt+S when "<CTRL+ALT+S> to enter System Configuration
Utility" appears.
3. Select Power menu option with Alt+P, select "Standby Control."
4. Press TAB to select COM1 Timeout, use/and down arrow keys to change
to "Disabled."
5. Choose OK to save this setting.
6. Press Alt+X to exit the utility, then choose "Save and Reboot."
7. Choose OK to restart the computer.
Cleaning
or replacing the cradle contact pins
The contact pins on the vehicle cradle are exposed to contamination
and stress when the computer is installed and removed from the cradle during
normal daily operation. The pins were designed to be cleaned or replaced
as required.
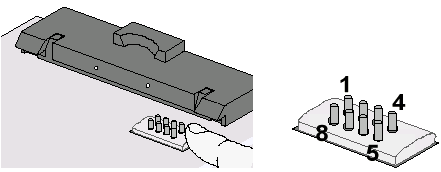
If the pins become dirty, they can be removed and cleaned with
an electrical contact cleaner or replaced. The power and ground pins are
pins 3 and 8 respectively. When charging problems are encountered and replacement
pins are not available, other pins in the contact assembly can be used
to field fix the unit until replacement parts are available.
Note Pin 8 on RF units is an RF connector and is not user replaceable.
Contact your support desk for information about replacing this RF connector.
To remove and clean the contact pins
1. Hold down the protective plastic cover.
2. Grasp pin and pull straight up, be careful not to bend it during
removal.
3. Clean pin with electrical contact cleaner and resintall it into
contact assembly.
If a pin is bent or cannot be cleaned, contact your organization's
help desk to obtain a replacement pin.
Use Internal
Landline Modem
The modem is on COM3 and it can use either IRQ 4 or 11.
Make sure COM3 IRQ is set correctly. Failure to do so may cause some communication
programs to lock up. Use the SCU to View or change the IRQ setting.
|