|
Power Supply
Battery/Speaker Assembly
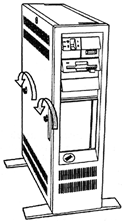
Opening Case
Removing Front Bezel
Opening Locked Unit
Floppy Support Structure
1780 POST Error on 8560 & 8580
Time / Date / Config Lost or Disk Error on 8560 & 8580
Time Not Updating
Low Battery Voltage May Cause Config Errors
Floppy Drive Variants and Reliability
Replacing Capacitors
On-Board Video
Opening Case
|
|
Use a coin or large standard screwdriver to turn the two large screwheads to
the left. After they are both loose (they're captive screws, they won't come
out), pivot the side cover on the bottom hinges until the top edge has cleared
the case. Pull up and out.
If the lock in the top center of the cover is locked, look at the next
section.
|
Removing Front Bezel
Open side cover. Look in the bottom front corner- pull the speaker/battery
assembly out horizontally by grabbing the speaker assembly frame and pulling
it.
Don't pull the battery header out of the planar, if that happens, your
configuration will disappear. Just put the loose speaker assembly down on the
bottom of the case.
Notice the white thermoplastic catch below the grille? Press it down and out
towards the front of the case. The second catch is sort of hidden by the black
foam around the grille. Feel for the inner edge of the foam (towards the inner
side of the case) and you will feel the end of the second catch. Push it down
and to the front. Once both catches are started (pushed level with the case)
grab the bottom edge of the front bezel and pull it out. The bezel should come
off.
Note: This bezel is NOT
like the 95 bezel where there are upper pivots. There is a single catch to the
right of the power switch. Think of the two bottom catches and the top catch in
the same way you'd pick up a bowling ball (which I haven't done since High
School). These "fingers" grip the frame of the case and pull the bezel onto
it.
Opening Locked Unit (from Tony Ingenoso)
It's very easy if there's no card in the bottom slot, less easy if there is.
- Flip the machine upside down
- Remove tall front bezel
- Loosen lower (now upper when upside down) slot retainer
- Take a thin blade screwdriver and push the slot blank into the case
- With a flashlight, you should now be able to see the front and rear
retaining tabs on the bottom (now top) of side cover.
- Lever down on these retaining tabs with a long thin screw driver until
they release. From the rear you'll be going in through the slot hole, from the
front you'll be going in through one of the ~3/8" holes the bezel snaps into.
It will be obvious which is the right one to use once you take a peek with the
flash light.
Once the first tab is clear, pull the cover out enough to slip a shim in so
it doesn't snap back in place again on you. Once both are clear, the cover will
come off.
If there is a card in the bottom slot, it presents more of a problem. If it
looks like something you don't mind wasting, loosen the retainer, pull on
connectors to get it out of the MCA slot and jam/twist/break enough of the thin
metal out of the way so you can get in with the long thin screwdriver.
Alternative Approach
Drill a couple of small holes in the bottom of the case where the cover tabs
are located, then use these holes to apply pressure to the tabs to get them to
release. This doesn't involve having to waste something in slot 8, but it does
involve mangling the case to a very minor degree. Use a depth gauge! If you
drill through the retaining tab, there will be nothing to push on ;-)
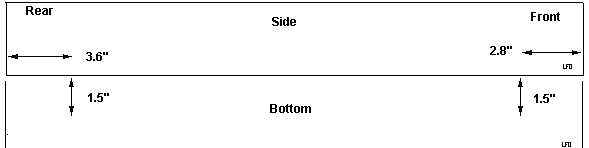
Ed. Measured my 8580. Front tab is 2.8"
from front corner, 1.5" in, set depth to .25". Rear tab is 3.6" from back, 1.5"
in, .25" deep.
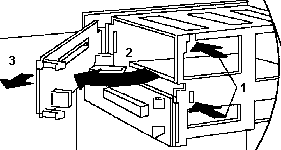
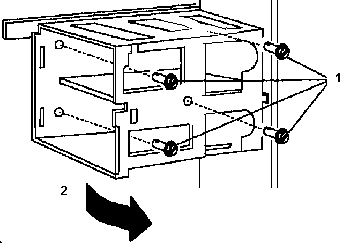
Floppy Support Structure
1780 POST Error on 8560 & 8580 (Record number: H064300)
When a 1780 post error is displayed on an 8560-041 or 8580-041, verify that
the fixed disk cables are installed properly. Correct installation of the
cables is shown in the Model 60 and Model 80 HMR.
Time / Date / Config Lost or Disk Error on 8560 & 8580
Believe it or not: the above mentioned errors often have one common reason.
Most recent effect is a frequent lost of configuration, internal clock shows
totally wrong values after longer power off cycles or the disk drive has a lot
read/write errors and installing a new battery or cleaning the disk-drive
doesn't help.
Of course: it is a cleaning problem, but on the systemboard.
The area on the systemboard just under the power supply fan tends to get very
dirty during the years. It is a good idea to fully disassemble the computer
and blow through the power supply with a compressor and a fine nozzle.
Don't do this in your office!
Everything will get very dirty. It is astonishing how much dust can
sit inside a single power supply.
Now look on your systemboard. It is awfully dirty, right ? I thought so.
Take a brush and a vacuum-cleaner to get it properly clean. Look for dust
and particles, which stuck between pins of the integrated circuits.
Just under the area where the fan sits, you will find (on a Mod. 80 board
- after a close look)
- the 8042 systemboard controller - for i.e. the keyboard
- the MC146818A CMOS configuration storage and RTC
- the D7205 disk-drive controller
- the NS16550 serial interface controller
- a 32.768 KHz crystal for the RTC
- (sometimes) the 8259A Interrupt controller ...
All in all this is a very sensible area - and the collected dust is
conductive in most cases and may cause the above mentioned trouble. Re-assemble
the PC, start reference disk, set date, time and configuration again and try,
if everything works again.
Time Not Updating
j131 asked:
I am using this machine under Linux (Debian 2.2.r3) as a sort of
occasional (in fact rather rarely turned on) home-file-server. The only symptom
is that: the time at power-up is the same as it was at power-down. Neither BIOS
nor OS complains... Only me... There are no 161/163 errors.
Alfred Arnold replies:
Then your machine's battery might be shortly before death.
Typically, when battery voltage drops over time, first the 32 kHz oscillator in
the RTC stops working (so time is standing still), but it is still high enough
to keep the CMOS RAM contents intact. You're probably not going to have to wait
too long any more till the 161 & 163 errors come up...
Low Battery Voltage May Cause Config Errors (Record number: H024809)
Intermittent configuration errors (161, 162, And 163) may be caused by Low
Battery Voltage or defective speaker battery assembly, FRU P/N33f5950.
To Check Battery Voltage:
- Turn off system power
- Remove battery from Speaker/Battery assembly
- Set meter to 12 V DC scale
- Check battery for minimum 5.5 V DC
The battery, FRU P/N 72X8498 should be replaced if it is below 5.5 V DC.
Note: Remove battery from speaker/battery
assembly when checking voltage in order to ensure an accurate voltage reading.
Floppy Drive Variants and Reliability (Mitsubishi and ALPS)
> Ask somebody for the drive from an unused 8580.
But "unused" does not automatically mean "in working condition".
In the worst case they placed the computer there because it showed odd errors
too. Worth a try nonetheless.
> How long is the half life time of these drives? They seem to die quite
often!
The ALPS drives had a much higher error rate than the Mitsubishi drives. The
ALPS are also much more wicked to take apart due to the amount of "0"-sized
Philips screws. The Mitsubishi is a somewhat cheap design, but far more easier
to service. Both drives are dust collectors due to the lack of a dust-shield
covering the disk slot when no floppy is in the drive.
The Mitsubishi 355 tends to collect dirt around the R/W-head actuator
spindle - which causes the head to stick and to improper positioning. The ALPS
often loose the head-damper plate (a piece of metal with some foam pad - glued
on the R/W head assembly (It's a remove-and-throw-away part).
The Mitsubishi also tend to have "killer caps" installed - which cause
600-errors (electronic errors). See details below.
Replacing Capacitors
Alan Douglas sounds off with:
> Unsoldering the caps is a little tricky. If you pull to strong or heat too
long, you might risk to tear off the copper pad from the PCB. That's what
happened to me :-( Fixing the cap on the thin copper lane was not easy! I found
it easiest to cut the caps in two with flush-cutting diagonals, then remove the
rubber seal and get access to the wire stubs from the top.
> For replacement of the 22uF and 1uF caps, I used surface-mountable
electrolytic caps of the same type. However, 0.22uF electrolytic caps are
difficult to obtain, so I used ceramic caps instead. I also used ceramics
there, and tantalum chips for the others.
The repair / checkup is nicely displayed
HERE.
Just a note that I occasionally repeat: the best way of
locating bad electrolytics is by checking their effective series resistance
(ESR). [Ed.] Search for "ESR meter" online.
On-Board Video
The VGA supports a maximum of 720-by-400 picture elements (PELs) in text
mode and 640-by-480 PELs in graphics mode. The VGA can support 256 colors or 64
shades of gray at one time. Composite video is not supported. Note that the
on-board VGA provides the Base Video capabilities, so there is no BVA slot on
the planar, it only provides one or two AVE slots.
Warning! Some non-IBM graphics adapters drive
rather than receive VGA signals. If more than one adapter that drives a VGA
signal is installed in a system, both adapters will be damaged.
|