|
Warning!
Some of these procedures may cause damage,
loss of control, or loss of data/programs if used without consulting
the specific manual for the procedure that you wish to perform! Rockwell
Automation has not reviewed or authorized this page, and DOES NOT make any
guarantees or warantees based on my extracts of their literature.
Warning! This page is a very condensed
guide to the Allen-Bradley (A-B) SLC 5/04 1747-L54x series of processors
and modules needed to accomplish MY inscrutable goals with the microchannel
architecture 1784-KT2 adapter. What I want
to do and components mentioned on this page may not be supported by the
software and/or hardware at your location, and inclusion or exclusion of any
SLC 5/04 component IMPLIES NOTHING of it's suitability for use in other
applications.
Warning! Please consult the
Rockwell Automation
documentation for the A-B product that you intend to use
for warnings and safety hazard notifications.This A-B software and hardware
may control 5vdc, 24vdc, or 120vac circuits, high speed mechanical equipment,
big whoppin' mechanical stuff that might crunch you, and other things that
don't take kindly to loosing control while they are in operation. For
mission critical applications, you should consult with personnel qualified
to service any equipment or software mentioned on this page.
DISCLAIMER:
I take no responsibility, expressed or implied, for your use of ANY
of the information on this page. I am NOT qualified by Rockwell Automation,
any other manufacturer or educational institution, to offer qualified advice
on any PLC or SLC component or the operation thereof. Unless specifically
noted, all information on this page is based on my best guess, and
may not be what Rockwell Automation would recommend for any specific circumstance.
All images, unless marked with "LFO" in them, are the property of A-B,
and may be subject to copyright laws if used for commercial purposes.
USE AT YOUR OWN RISK!
Publication 1747-6.2 The SLC 500 Installation and Operations Manual
Installation
Manuals
The PLC5 and SLC500 families are the ones to consider. The PLC2 and
PLC3 are too ancient (pre-1985), getting the correct software is problematic.
BTW, don't confuse the PLC (5/15, 5/20, 5/40, etc) with the SLC (5/02,
5/03, 5/04, etc) families. Despite the similarity in numbers they're actually
totally separate creatures, and use different programming packages to configure.
PLC5 Processors HERE.
SLC 500 Processors HERE
The SLC500 (Pronounced "Slick500")are smaller, maybe about
1/4 the size as shown in the link below. Unless you already have piles
of PLC5 pieces/parts to play with, I'd go with the SLC5/04 for a home project.
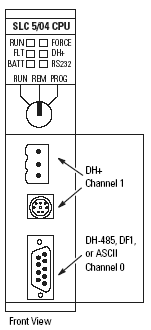
1747-L54x Processor Card, Front
|
The standard DH-485 port has been replaced with a DH+™
port, providing high-speed SLC 5/04-to-SLC 5/04 communications and direct
connection to PLC-5 controllers. Modular I/O systems can be configured
with a maximum of 3 chassis (30 total slots) and from 4 I/O points to a
maximum of 4096 I/O points. The available memory options are 16K, 32K,
or 64K. In addition, there is an SLC 5/04P option, which is designed specifically
for the Plastics Industry and contains ERC2 algorithms for Plastics Machinery
Control.
Specification SLC 5/04
Cat. No. 1747- L541 L542 L543
Memory Size (Words) 16K 32K 64K
Bit Execution (XIC) 0.37 µs
|
1747-L5x Processor Card LEDs
RUN
(Green) |
On (steady) |
Run mode. |
|
Flash (running) |
Transferring program from RAM to memory module. |
|
Off |
Mode other than Run. |
FLT
(Red) |
Flash ( power up) |
Processor not configured. |
|
Flash (running) |
Major error in processor chassis or memory. |
|
On (steady) |
Fatal error (no communications). |
|
Off |
No errors. |
BATT
(Red) |
On (steady) |
Battery - low voltage, missing or not connected. |
|
Off |
The battery is functional. |
FORCE
(Amber) |
Flashing |
One or more input or output addresses forced to On or Off state but
the forces have not been enabled. |
|
On (steady) |
The forces have been enabled. |
|
Off |
No forces are present or enabled. |
DH+
(Green / Red) |
On (steady) |
Communications Active Bit (S:1/7) is set in System Status file and
cpu is actively communicating on DH+ network. |
|
Flashing Green |
Processor trying to establish communications but there are no other
active nodes on DH+ network. |
|
Flashing Red |
Duplicate nodes on link with same node address. |
RS-232
(Green) |
On (steady)
DF1/ASCII Mode |
Processor is transmitting on the network. |
|
Off
DF1/ASCII Mode |
Processor is not transmitting onthe network. |
|
On (steady)
DH-485 Mode |
Communications Active Bit (S:33/4) set in System Status file, cpu is
actively communicating on DH-485 network. |
|
Flash
DH-485 Mode |
Processor trying to establish communications, but no other active nodes
on DH-485 network. |
|
Off DH-485 Mode |
A fatal error is present (no communications). |
Note: If the
LEDs on the SLC 5/04 turn on in a predefined sequence, the SLC 5/04 is
in the process of downloading a new operating system.
Keyswitch
The -L54x processors include a 3-position keyswitch that
lets you select a mode of operation: RUN, PROGram, and REMote. You can
remove the key in each of the three positions.
Warning! Depending on
the size of your user program, the processor can take up to 2.5 seconds
to change modes when you change the position of the keyswitch from RUN
to PROG or to REM. Do not use the keyswitch in place of a hardwired master
control relay or an emergency-stop switch.
RUN Position
Places the cpu in the Run mode. The cpu scans/executes
the ladder program, monitors input devices, energizes output devices, and
acts on enabled I/O forces. You can only change
the processor mode by changing the keyswitch position. You cannot perform
online program editing.
To change the processor mode to Run, toggle the keyswitch
from PROG or REM to RUN. When the keyswitch is left in the RUN position,
you cannot use a programmer/operator interface device to change the processor
mode.
PROG Position
This places the cpu in the Program mode. The processor
does not scan/execute the ladder program, and the controller outputs are
de-energized. You can perform online program editing. You can only change
the processor mode by changing the keyswitch position.
To change the processor mode to Program, toggle the keyswitch
from REM or RUN to PROG. When the keyswitch is left in the PROG position,
you cannot use a programmer/operator interface device to change the processor
mode.
REM Position
This places the processor in the Remote mode: either the
REMote Run, REMote Program, or REMote Test mode. You can change the processor
mode by changing the keyswitch position or by changing the mode from a
programmer/operator interface device. You can perform online program editing
in this position.
To change the processor mode to REM, toggle the keyswitch
from RUN or PROG to REM. When the keyswitch is in the REM position, you
can use a programmer/operator interface device to change the processor
mode.
1747-L54x Processor Card, Left Side
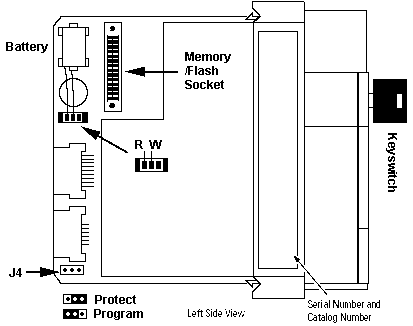
Install Memory
Apply Firmware Upgrade
Install Battery
Restore Factory
Defaults
Restore Factory Defaults
Note: This
is only recommended if the communication channels have been shut down
due to the configuration parameters, or if you absolutely cannot establish
communications with the processor.
Warning!
If you return the processor to the initial factory conditions, the user
program is lost and communication configurations are returned to their
default settings.
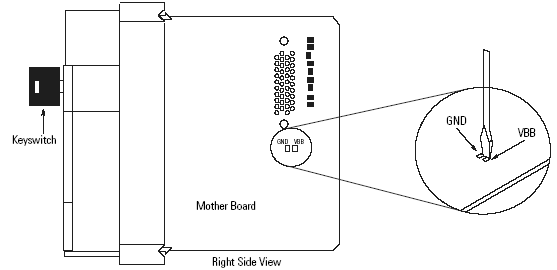
1. Remove power from the SLC 500 power supply.
2. Remove the processor from the chassis.
3. Disconnect the battery by removing the battery
connector from its socket.
4. Locate the VBB and GND connections on the
right side of the motherboard.
5. Place a small bladed screwdriver across the
VBB and GND connections and hold for 60 seconds. This returns the processor
to the initial factory conditions.
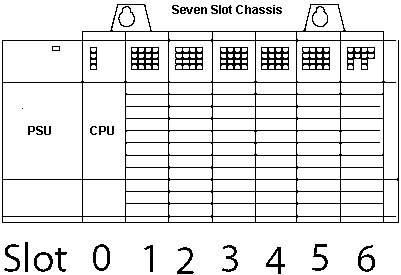
Seven Slot Chassis 1746-A7
Install 1747-M13
Memory Module
1. If processor is installed, turn off power.
2. Remove module - press retainer clips at both
top and bottom and slide it out.
3. Locate connector on 1747 -L541/2/3 processor
board. Place memory module onto socket or connector and press firmly in
place.
4. Install the processor module into the chassis.
5. Restore power to the controller.
Memory Modules (SLC
500™ Memory Modules for Fixed and Modular Controllers)
1747-M13 64 K, Flash EPROM Memory Module for
SLC 5/03, 5/04, and 5/05 Series C (or later) OS Firmware only. -M1 and
-M2 are ONLY
for the 5/01 and 5/02 processors.
Note: If
you are using a 1747-M15 memory module adaptor to program a 1747-M13 memory
module, you must use the Series B 1747-M15 memory module adaptor. If you
use the Series A 1747-M15 memory module adaptor, you may damage the memory
module.
Firmware Update
Install Battery
1747-BA Battery SANYO P/N CR14250SE
1.Remove power from SLC 500 PSU.
2.Remove processor from chassis - press retainer
clips at top and bottom and slide it out.
3.Unplug battery connector and removeold battery.
4.Insert new battery into battery retaining clips
and plug battery connector into the socket.
5.Insert module back into chassis.
6.Restore power to the SLC 500 power supply.
Note: The
SLC 5/04 processor has a capacitor that provides at least 30 minutes of
battery back-up while the battery is disconnected. Data in RAM is not lost
if the battery is replaced within 30 minutes.
EEPROMS for the 1746BAS and BAST modules
The proms the 1746-BAS and 1746-BAST modules
use are listed below.
1746-BAS proms are the 1747- M1 - M2 - M3 - M4.
a) The M1 - M3 are 8K bytes memory.
b) The M2 - M4 are 32K bytes memory.
c) The M1 - M2 are EEPROM.
d) The M3 - M4 are UVPROM.
Note: The BAS module cannot burn/program these.
Requires uvprom programming equipment.
1746-BAST proms are the 1771 - DBMEM1 and 1771
- DBMEM2.
a) The 1771- DBMEM1 is 8K bytes.
b) The 1771-DBMEM2 is 32k bytes.
Note: 1747-M11 - M12 ARE NOT
USEABLE with 1746-BAS or 1746-BAST modules.
> The 1747 M11 is a 32K "FLASH EPROM" for 5/03 - 5/04.
> The 1747 M12 is a 64K "FLASH EPROM" for 5/03 - 5/04.
Adapter Sockets
Adapter sockets are required when using commercial
PROM programmers to program and erase memory modules. The memory module
fits into the adapter socket, and then the adapter socket fits into the
zero insertion force (ZIF) socket on the PROM burner.
Adapter Socket Descriptions
Cat. No. 1747-M15
Description: SLC 5/03, SLC 5/04, and SLC 5/05
Adapter Socket for 1747-M13
1746 I/O Module Overview
The 1746 I/O product line provides more than 60
modules to meet your application needs in a modular assembly - including
intelligent I/O modules.
* Digital I/O modules provide
4 through 32 I/O per module.
o Digital I/O circuits interface to on/off sensors/actuators.
o Ladder logic has direct access to I/O values.
o Input modules, output modules, and combination input/output modules.
o Ac and dc input modules.
o Ac, dc, and relay-contact output modules.
* Analog I/O modules provide
4 through 16 I/O per module.
o D/A and A/D conversions interface analog signals to data-table values
o Ladder logic has direct access to I/O values.
o Input modules, output modules, and combination input/output modules.
o A high level of resolution for accurate control in a broad range of analog
applications.
* Intelligent I/O modules
are available to enhance your control system.
These modules include a high-speed counter module, a BASIC language module,
a motion control module, and communication modules. Each provides a unique
easy-to-use interface between the I/O circuits (digital and/or analog)
and the CPU.
Digital I/O Modules
1746 Digital ac Input Modules
1746-IA4
85
132V ac 4 inputsGeneral-purpose 120V ac inputs
1746-IA8
"
8 inputs
1746-IA16
"
16 inputs
1746-IM4
170
265V ac 4 inputs General-purpose 220/240V ac inputs
1746-IM8
"
8 inputs
1746-IM16
"
16 inputs
1746-IN16
24V ac / dc Sink (Source Load) 16 inputs V-ac or V-dc operation
1746 Digital dc Input Modules
1746-IG16 4.5
5.5V dc Source (Sink
Load) 16 inputs TTL input BCD inputs
1746-IB8 10
30V dc Sink (Source Load)
8 inputs General-purpose dc inputs
1746-IB16
"
16 inputs
1746-IV8 10
30V dc Source (Sink Load) 8
inputs
1746-IV16
"
16 inputs
1746-ITV16 16 inputs Fast response
for time-critical applications
1746-ITB16 10
30V dc Sink (Source Load)
16 inputs
1746-IB32 15
30V dc Sink (Source Load)
32 inputs General-purpose dc inputs. High-density for limited panel
space
1746-IV32 15
30V dc Source (Sink Load)
32 inputs
1746-IC16 30
55V dc Sink (Source Load)
16 inputs General-purpose 48V dc inputs
1746-IH16 90
146V dc Sink (Source Load)
16 inputs General-purpose 125V dc inputs
Analog I/O Modules 1746 Analog I/O modules
do not require external power.
1746-NI4 4 inputs (±10V
dc, ±20 mA)
1746-NI8 8 inputs (±10V
dc, ±20 mA)
1746-NI16I 16 inputs
(±20 mA, 4
20 mA, 0
1 mA, or 0
20 mA)
1746-NI16V 16 inputs
(±10V dc, 1
5V dc, 0
5V dc, or 0
10V dc)
1746 Analog Output Modules
1746-NO4I 4 outputs
(0
20 mA)
1746-NO4V 4 outputs
(±10V dc)
1746-NO8I 8 outputs
(0
20 mA)
1746-NO8V 8 outputs
(±10V dc)
1746 Analog Combination Modules
1746-NIO4V 2 inputs (±10V
dc, ±20 mA), 2 outputs (±10V dc)
1746-NIO4I 2 inputs (±10V
dc, ±20 mA), 2 outputs (0-20 mA)
1746-FIO4I (current outputs) 2 inputs
(differential, 0-10V dc, 0-20 mA), 2 outputs (0-20 mA)
1746-FIO4V (voltage outputs) 2 inputs
(differential, 0-10V dc, 0-20 mA), 2 outputs (±10V dc)
1746 RTD and Thermocouple Modules
1746-NR4 RTD/Resistance Analog
Input Module
4 inputs
100Ohm, 200, 500 Platinum
120Ohm Nickel
604Ohm Nickel/Iron
10Ohm Copper
150Ohm, 500, 1000, 3000 direct resistance
1746-NR8 RTD/Resistance Analog
Input Module
8 inputs
100Ohm, 200, 500 Platinum
120Ohm Nickel
604Ohm Nickel/Iron
10Ohm Copper
150Ohm, 500, 1000, 3000 direct resistance
1746-NT4 Thermocouple/mV Analog
Input Module
4 inputs
B, E, J, K, N, R, S, T Thermocouple and ±50 mV or ±100 mV
1746-NT8 Thermocouple/mV Analog
Input Module
8 inputs
B, E, J, K, N, R, S, T Thermocouple and ±50 mV or ±100 mV
1746-INT4 Isolated Thermocouple/mV
Analog Input Module
4 inputs
B, C, D, E, J, K, N, R, S, T Thermocouple and ±50 mV or ±100
mV
Power Supply
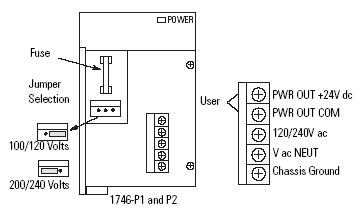
Cat. # Vin
5v 24v User Amp Capacity
Inrush Amps
1746-P1 85-132 ac
2 A 0.46 A 0.2 A @ 24V dc
20 A
47-63 Hz
For the 1746-P1 and -P2 power supplies, use PWR
OUT +24V dc and PWR OUT COM terminals to power 24V dc sensors and loads.
The terminals on the 1746-P1 and -P2 provide an isolated, nonfused 200
mA, 24V dc power supply.
Bare minimum for a SLC500 project:
- 7-slot rack (or larger) P/N 1746-A7 or similar
- Power supply module, 1746-P1 or similar
- 5/04 CPU module, 1747-L541, -L542, or -L543
- I/O modules
- RSLogix500 Programming software ( NT or 9X.
Was there ever a DOS version?)
- KT card
- DH+ compatible Twinaxial network cable a/k/a
"Blue Hose", Belden #9463 or similar.
RSLogix 500
The RSLogix 500 ladder logic programming
package was the first PLC programming software to offer unbeatable productivity
with an industry leading user interface. RSLogix 500 is compatible with
programs created using Rockwell Software's DOS-based programming packages
for the
SLC 500 and MicroLogix families of processors,
making program maintenance across hardware platforms convenient and easy.
RSLogix 500 may be used with Windows 98®, Windows NT™ (4.0), Windows
2000, or Windows XP.
|